Choosing the right pedalboard size is an essential step when designing your new board, but it can also be pretty tricky. In this article, I’ll take you through all the considerations you need to make when selecting the right dimensions for your pedalboard, with an example at the end.
What Size Pedalboard Do I Need?
To choose the right size pedalboard you need to factor in the dimensions of the pedals, space between each pedal, and room for the power supply (if it will not be mounted underneath the board). You may also want to leave room for extra pedals, or consider if you need a smaller board for portability.
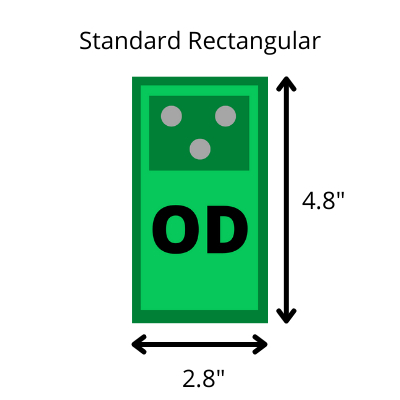
Different pedals have different dimensions, which is what makes this topic a little more complicated than it needs to be. For standard size pedals (5 x 3″) e.g. Boss Pedals, here is the typical pedalboard size you’ll need.
| Number of Standard Pedals | Average Pedalboard Dimensions | Number of Rows |
| 3 | 14 x 6” | One |
| 4 | 19 x 6” | One |
| 5 | 24 x 6” or 14 x 12” | One or two |
| 6 | 19 x 12” | Two |
| 8 | 24 x 12” | Two |
| 10 | 30 x 12” | Two |
General Rules for Standard Pedals
- Each row is around 5-6″ tall
- A row of 14″ is enough for roughly 3 pedals
- You’ll need around 5″ extra for each pedal you want on the row
Other Pedal Types
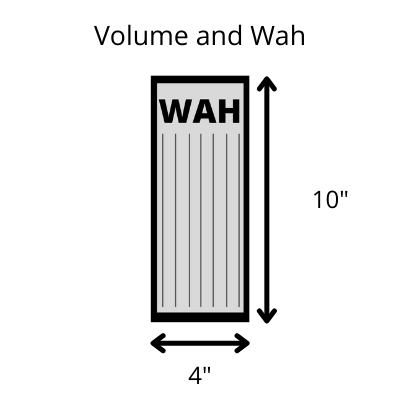
If you’re using wide individual pedals, multi-effects pedals, wah or volume pedals you will need more space. Wah and volume pedals in particular are roughly double the length of standard sized pedals so in this case, you’ll need two rows and the pedal will take up both of them. Equally, if you’re using mini pedals then you won’t need as much room.
Check out my comparison between mini and full-size pedals for more information.
Preliminary Considerations
There are two types of players who will be looking at this article:
- Players who already know the pedals, power supply and cable they will be using.
- Players who are at the start of the design process and are unsure of the pedals they need.
Have a think about your answers to the following:
- How many pedals do you want to have on your board?
- Do you need room for more pedals in the future?
- Do you need it to be portable for gigging, or will it stay sitting in one place?
- How much space do you have where you plan on storing the board?
Player type #1 is probably clear on the answer to all these questions, so if you’re in this group, skip ahead a bit further.
If you’re completely new to pedalboard designing and don’t know how many pedals you need, check out my ultimate pedalboard building guide to help you figure out your answers to the questions above.
If you’re a complete beginner, it’s a good idea to do some research and figure out which pedals you really need. Some players are worried about running out of space on their boards, so end up purchasing a huge board “just in case” they need more pedals in the future.
Having room for an extra 2-3 pedals is okay, but try not to get carried away. Remember you can always swap pedals in and out of the board, they don’t need to be on it at all times.
Large boards are great for holding loads of pedals but they are:
- Harder to transport
- Take up loads of floor space
- Are more expensive
Working Out How Much Room You Need
When figuring out what pedalboard size you need, there are three pieces of equipment to consider which will all take up room:
- The pedals
- Space between the pedals
- Power supply
Let’s take a look at each of them in a bit more detail.
Effects Pedals
Okay so it’s hard to forget about this one when working out the size of board you need, but it’s important to be clear on it.
You’ll need to know how many pedals you are going to have on your board, and the exact model of each pedal if you want everything to fit perfectly. If you’re unsure, then go for a slightly larger board.
There are several different types of effects pedals that take up different amounts of space. Here are some examples.
| Pedal | Type | Height x Width (inches) | Height x Width (cm) |
| Boss SD-1 | Standard | 5.1 x 2.9” | 13.0 x 7.3 cm |
| Electro-Harmonix Big Muff | Wide | 6.9 x 5.5” | 17.5 x 14.0 cm |
| Wampler Hot Wired | Square | 4.5 x 4.5” | 11.4 x 11.4 cm |
| Dunlop GCB95 Cry Baby | Wah/ Vol | 10.0 x 4.0” | 25.4 x 10.2 |
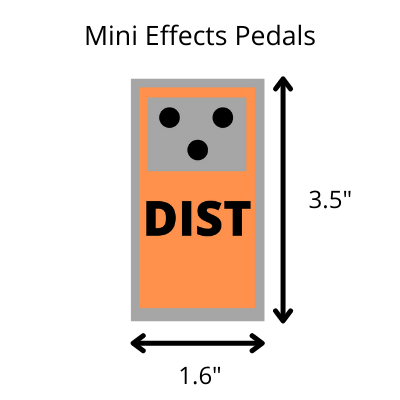
| Ibanez Tube Screamer Mini | Mini | 3.5 x 1.6” | 8.9 x 4.1 cm |
| Line 6 HX Stomp | Multi-Effects | 5.0 x 7.0 | 12.7 x 17.8 cm |
| Dunlop Fuzz Face | Round | 8.0 x 7.3” | 20.3 x 18.5 cm |
Most pedals are in the “standard” category and are around 5 x 3″. However, if you are using multi-effects or wah and volume pedals, then you’ll need to factor in a lot more space.
Have a look at my article on the different types of pedals and their sizes for loads more examples to help you plan how much space you need on your board.
Space Between Pedals
In general, you will need around 2″ between each pedal on the board for the cables. Most pedals have the input and output jacks located on opposite sides of the pedal, so 2″ allows for the patch cable connection when the pedals are organised in a row.
However, the amount of space you’ll need does depend on a few factors:
- The cables you’re using
- Whether your pedals are organised in a single row or multiple rows
- The location of the input and output jacks
Cable Types
Starting off with the cables. There are two methods of connection to choose from here: patch cables and cable kits.
Patch cables are what most players typically think of. They can be purchased in packs and are all a standard length. There are usually two types: standard cables and straight couplers. With both types you’ll usually need 2″ between the pedals. Different brands will make different styles, with some having a low-profile or angled design allowing you to place the pedals closer together.


The second option, is to go for a cable kit. These include cables and connectors, so you can cut different lengths to make custom patch cables. These are great if you want to save space, allowing you to connect pedals much closer together. For example, the Boss Cable Kit boasts that you can place pedals as close as 0.4″ apart.

Boss Solderless Cable Kit on Amazon
Pedalboard Organisation
It’s also important to consider how you will be organising your pedals. Will you be using multiple rows, or will all the pedals be ordered in a single line? This will likely depend on the pedals that you’re using. I’ll go through this in more detail in the “saving space” section of the article a little later on.
Input and Output Jack Location
Most pedals have their jacks located on opposite sides, so the pedals can be connected in a continuous line. However, some manufacturers have started placing the input and output jacks on either the top or the bottom of the pedal, allowing them to be placed closer together. If you already know what pedals you’re using, make sure you check the location before planning your board.

Power Supply
The final thing you’ll need to allow space for is the power supply.
This only applies if you’re using a power block instead of an AC adapter and daisy chain splitter.
Personally, I think a power brick is the better option because it offers better sound quality, but it does take up space on the board, unlike the adapter and daisy chain. Check out my pedalboard building guide for a comparison of the different power supply options.
In some cases, you can actually mount the power brick on the underside of the board (e.g. with angled designs), so you don’t even need to consider it when working out what size board you need. However, if you’re using a flat board which rests on the ground rather than on legs, then this won’t be an option.
Here is a table showing the average size of power bricks so you can work out how much room you need to account for.
| Power Brick | Outputs | Width x Depth (Imperial) | Width x Depth (Metric) |
| Strymon Ojai R30 | 5 | 5.1 x 2.3” | 13.0 x 5.8 cm |
| Truetone 1 Spot Pro CS6 | 6 | 6.3 x 3.5” | 16.0 x 8.9 cm |
| CIOKS DC7 | 7 | 6.3 x 3.5” | 16.0 x 8.9 cm |
| MXR DC Brick | 8 | 4.3 x 2.3” | 10.9 x 5.8 cm |
| MXR M238 | 10 | 4.7 x 2.9” | 11.9 x 7.4 cm |
| Truetone 1 Spot Pro CS12 | 12 | 8.1 x 3.4” | 20.6 x 8.6 cm |
| Voodoo Lab Pedal Power 3 | 12 | 7.0 x 3.4” | 17.8 x 8.6 cm |
| CIOKS CIOKOLATE | 16 | 11.5 x 3.9” | 29.2 x 9.9 cm |
Saving Space
Before we move onto the planning stage, I wanted to throw in some space-saving tips you can use to make the most out of a smaller pedalboard.
There are three areas you can target to maximise the space on your board:
- Pedal choice
- Connection cables
- Board Organisation
Pedal Choice
If you’ve already decided exactly which pedals you want on your board, then this won’t be much use. However, if you’re still in the planning stage, being conscious of the dimensions of each pedal can really help.
Now I’m definitely not saying that you should choose a smaller pedal that you don’t like the sound or features as much compared to the large pedal. But, if you are completely torn between the two pedals then selecting the smallest one is a good way to break the tie.
Also, choosing pedals with the input/ output jacks on the top of the pedal rather than on the side can help you place them closer together.
Don’t forget to have a look at mini pedals as well. They are often around 2/3 or even 1/2 the size of most full size pedals and are much cheaper. Some mini pedals will sacrifice some controls which can be limited, whereas others don’t make any compromises.
For example, the Ibanez Tube Screamer Mini is 3.5 x 1.6″ whereas the full size version is 4.9 x 3.0″. Despite the dramatic reduction in size, it sounds identically to the original TS808 and has all the same controls. Here is a table comparing the sizes of popular regular and mini pedals.
| Pedal | Full Size Dimensions | Mini Dimensions | Reduction (of total area) |
| Keeley Compressor | 4.4 x 2.4” | 3.7 x 1.8” | 37% |
| TC Electronic PolyTune 3 | 4.8 x 2.8” | 3.7 x 2.0” | 45% |
| MXR Phaser | 4.3 x 2.3” | 3.6 x 1.5” | 45% |
| Wampler Plexi-Drive | 4.5 x 3.5” | 3.5 x 1.5” | 67% |
| Dunlop Cry Baby Wah | 10.0 x 4.0” | 5.3 x 3.0” | 60% |
| Dunlop Fuzz Face | 8.0 x 7.3” | 3.5 x 3.5” | 79% |
| Dunlop DVP4 Volume | 10.0 x 3.9” | 6.0 x 3.0” | 54% |
Check out my list of the 5 best effects pedals to buy first.
Connection Cables
We already touched on this one in the previous section, but going for either low-profile patch cables, or a DIY cable kit is your best option if you want to pack your board with more pedals. A lot of space is wasted between pedals with regular patch cables so consider this Boss Solderless Cable Kit on Amazon if you want to maximise the space.
Board Organisation
Finally, you can also get creative with the way you organise your pedals on your board to help save some space.
Of course, pedals need to be ordered in a specific way in the chain to get the most out of them (more on this in my pedal chain order article), however, if you use a cable kit then you can place them anywhere you want on the board itself, and just make sure the cables go in the correct order.
This is great if your pedals come in all manner of shapes and sizes, because you can position them in a specific way to make sure you are making best use of your space.
Placing your power supply underneath the board is also a good way to save some space on top for all your pedals. This is usually possible with angled boards or boards which are raised from the ground.
Also remember that everything doesn’t actually need to go on the board. For example, if you’re using a volume or wah pedal and there’s no room on your board, then there’s no harm in placing it next to the board so you have room for the rest of your pedals. The same goes for your power supply. Sure, it doesn’t look as neat but it still gets the job done.
Planning it Out
Hopefully you’re now in a position to check exactly how big your board needs to be, and the best way to do this is by planning it out.
- If you already have all your pedals, cables and power supply, simply map it out on the floor. Then you’ll know exactly how much space you require.
- If you don’t have all your equipment, your best bet is to get a piece of paper and draw it out. It may take a little while but boards are expensive and this is the most fool-proof way of making sure you select the correct board size.
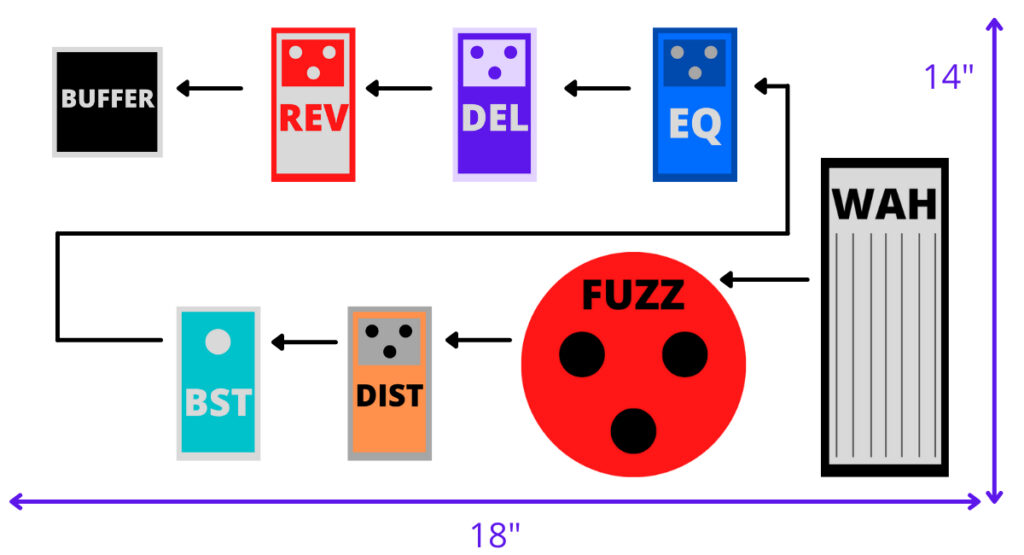
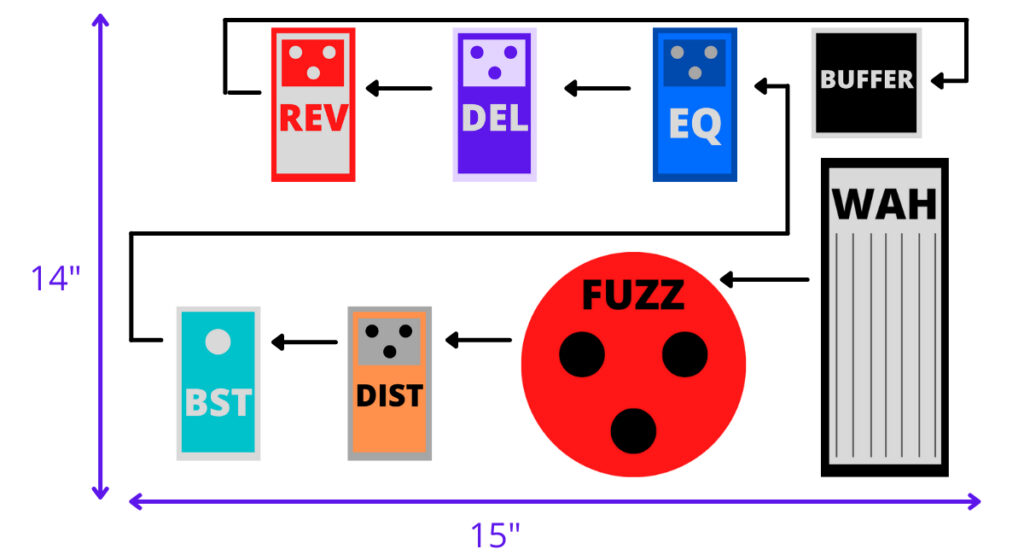
Example
Here’s an example. It’s not drawn to scale but includes all the dimensions so I could easily work out what size board I needed.
- 6 pedals
- Order: Dunlop Cry Baby > Keeley Compressor > Ibanez TS Mini > Xotic Booster Mini > MXR Phase 90 > Source Audio Collider Reverb and Delay
- 2 rows
- Power supply mounted underneath
- Width of pedals and space between = 15.5″
- Length of tallest point = 10″
- Accounting for some space around the edge = minimum size of 17.5″ x 12″
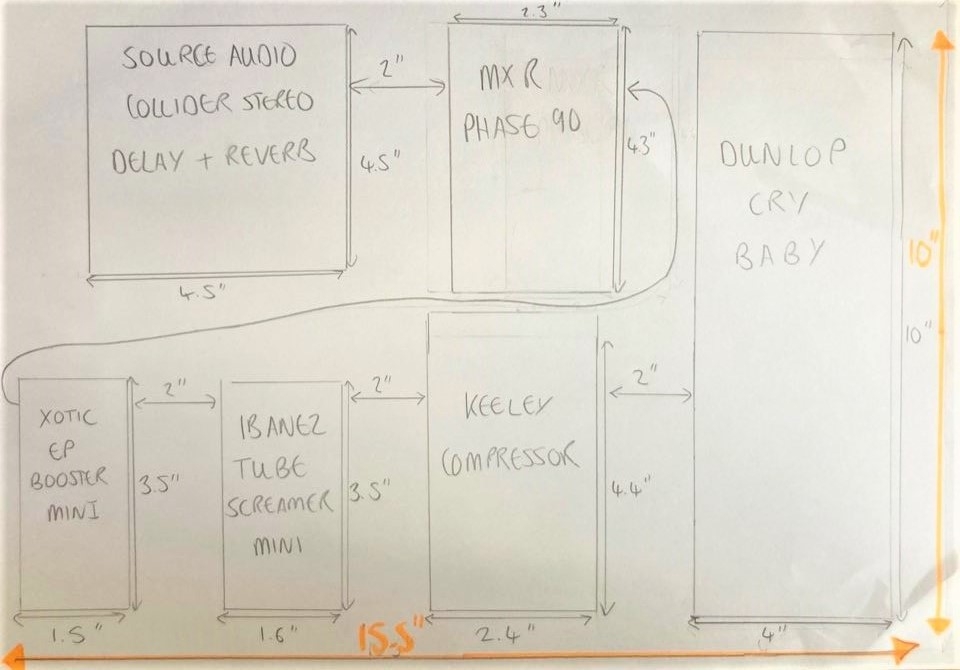
In this example, I would go for a Pedaltrain Classic Jr because it’s raised rail design allows you to mount the power supply underneath the board and tuck away excess cables neatly. The dimensions of this board are 18 x 12.5″ making it an ideal size. Here is a link to the Pedaltrain Classic Jr on Amazon so you can check the price.

Pedaltrain Classic Jr (image links to Amazon)
Organising your new pedalboard? Check out my ultimate guide to designing a pedalboard including all the equipment you need and a step by step formula to getting set up in a pain-free way.