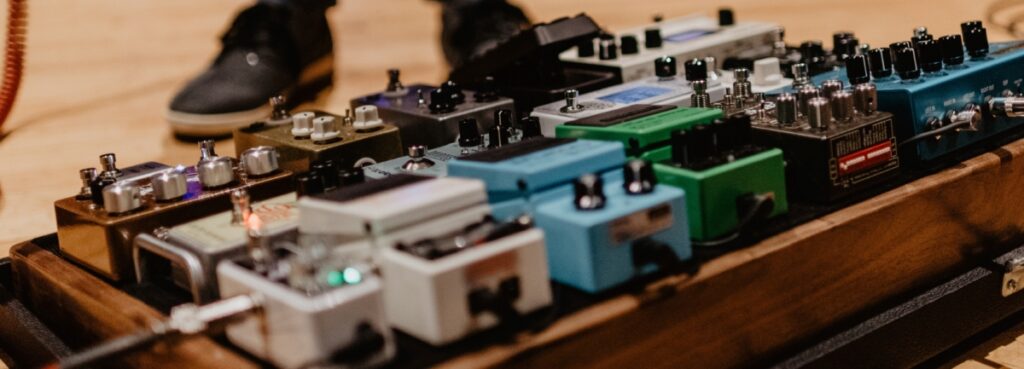
Building an effects pedalboard for a guitar is an exciting experience, but it can get a bit overwhelming. In this article, I’ll take you through the process of building a pedalboard step-by-step including everything you’ll need on the way to make sure you build the ultimate board.
How to Make a Pedalboard
To build a pedalboard you will need first need to decide what size you need. You can then select the style of board (angled, case, flat), the power supply and choose the cables to attach the pedals. To assemble the board, attach each pedal to the board using Velcro if possible, and connect the cables.
What You’ll Need
To build a guitar effects pedalboard, you will need the following:
- The board itself
- Pedals
- Power supply
- Cables
There are quite a few different options with each of these components which makes pedalboard building a complicated business. Here is an example of each component (the images link to Amazon).

Pedalboard

Tube Screamer

Power Supply

Patch Cables
To keep things as simple as possible but without neglecting any information, I’ve organised this article into steps so you can go through the process and know exactly what to buy and how to put it together by the end of it.
Figure Out What You Want to Achieve
Before we even consider anything else, you need to have a think about the following questions:
- What style of music do you play? Do you play multiple styles?
- Are there any effects/ pedals that are essential? If so, how many?
- Do you need the board to be portable?
- Will you be growing your pedal collection in the future?
- How much space do you have for your board?
- Are there any special power requirements for your pedals (e.g. not standard 9V)?
You don’t need to know the answers to all these questions right away, but having a think about them as we go into the rest of the article will help you make your decisions more easily.
Make a Budget
I’m a big believer that setting your budget up-front and being clear about it from the get-go is essential when building a pedalboard. You could easily end up spending well over a thousand dollars if you do down the rabbit hole and your budget will influence every one of your decisions as we go through the rest of the build process.
Remember you’ll need to allocate a budget for the board itself, the pedals, power supply and the cables. To get an idea of how much things will cost, here are some rough prices for each component.
- Pedals: individual pedals range from around $50 to $400 (£30 to £300 in the UK) each depending on the brand and functionality.
- Boards: these start at around $60 and range up to $400. Boards which fit 3-5 pedals start at $60 (£40 in the UK) and boards which fit 6-8 pedals start at around $80 (£50 in the UK).
- Power supply: power supplies that use daisy chains are very cheap and start at around $150 (£10 in the UK), whereas isolated DC power supplies cost upwards of $30 (£30 in the UK).
- Cables: patch cables cost around $12 for a pack of 3 (£12 in the UK). Cable kits which supply around 5 cables start at around $30 (£30 in the UK).
Example Cost for Good Quality Pedalboard with 6 Pedals
- Board = $80
- 6 pedals = roughly $500
- Power supply = $50
- Cables = $50
- Total = $680
Of course, this is just an example of how much a good quality board will cost if you aren’t conscious of your spending. You can definitely build something a lot cheaper than this which includes 6 pedals, so that’s why it’s vital to be strict with your budget from the start.
You can also pick up bundles to help keep the cost down, just make sure you aren’t making any compromises that you might end up regretting later on.
Choose the Correct Pedalboard Size
You may want to figure out which pedals you want first (next step) before choosing what size board you need. However, if space and budget are limiting factors, then deciding on the board size first can be helpful.
There are three things to consider here:
- How many pedals will you need it to hold? Do you plan on growing your collection?
- How much space do you have?
- Does it need to be easily transported for gigging?
A lot of beginner board builders want to purchase a huge pedalboard because they’re worried that they will want to expand their pedal collection in the future and may run out of space. Whilst this is a logical consideration, be cautious about buying a pedalboard too big.
The more space you have on your board, the more it’ll bug you and you’ll want to fill it (and that means spending more money)! Also, you may expand your collection in the future, but will you be using all those pedals at the same time? Remember that you can swap and change the pedals after you’ve built your first board.
Also if you’re gigging, keep portability at the forefront of your mind because big pedalboards can be a nightmare to transport.
If it’s your first board, try not to get too carried away. If you currently have 4-5 pedals, then it’s likely that a board which fits 6 pedals will be fine. But only you will know how many pedals you eventually want on your board. But keep in mind that complicated boards can be harder to use and of course, take up loads of space.
Here is a table comparing different board sizes and the number of pedals they fit so you can get an idea of how big the board should be.
| Board | Size | Number of Pedals |
| Pedaltrain Nano | 14 x 5.5” | 3 |
| Pedaltrain Metro 16 | 16 x 8” | 4 |
| Pedaltrain Classic Jr | 18 x 12.5” | 6-8 |
| Pedaltrain Classic 2 | 24 x 12.5” | 9-10 |
| Pedaltrain Classic Pro | 32 x 16” | 12 |
Remember that not every pedal is the same size. Here are some dimensions of popular pedal types so you can get an idea of how much space you’ll need:
- Standard size (e.g. Boss pedals, Ibanez Tube Screamer etc.) are roughly 5 x 3″ (12.5 x 5.5 cm)
- Wah/ volume pedals are usually around 10 x 4 ” (25 x 10 cm)
- Large round style (e.g. Jim Dunlop Fuzz Face) are roughly 8 x 8″ (20 x 20 cm)
- Mini size are roughly 3.5 x 1.5″ (9 x 4 cm)
- Multi-effects and wide-style pedals are roughly 3.5 x 4.5″ (9 x 11.5 cm)
Check out my article on the size of guitar effects pedals for plenty more examples and some extra space-saving tips for your board.
Make sure you factor in the room between pedals as well. You’ll likely need the following distances depending on the cable:
- Standard patch cable: 2″
- Straight coupler: 2″
- Low-profile patch cable: 1″
Also remember that some pedals are meant to be placed horizontally and some vertically. If you are using patch cables you are more limited in terms of placement, but if you are using a cable kit then you have more flexibility and can pack your board a bit fuller most of the time (more on this in the cables section later on).
Finally, factor in room for your power supply. Some pedalboards allow you to mount this underneath the board to save space, and others require room on the top. Some power supplies can be quite large (e.g. the isolated DC supplies) for example the Tone City Substation which has 10 outputs is 6.5 x 2.8″ which is even larger than a standard pedal.
Key Points to Consider:
- Size and shape of the pedals you want to use
- If you’re going for a single row setup or using multiple rows (useful if you have different sizes or lots of pedals)
- If the power supply fits on the board or underneath
- How many pedals you need now and if you want room to expand
- How much room you need between pedals depending on the cable connection
I’ve written a full guide to help you work out what pedalboard size you need here. It includes various different examples and a step-by-step process to make things super simple.
If you’re really struggling with this step, check out pedalboardplanner.com which allows you to add in all your pedals and see what size board you need.
Decide on the Pedals
You may want to do this step before figuring out what size pedalboard you need if you already know what types of pedals you need. However, if this is your first board and you aren’t sure exactly which pedals to get then this should be your next consideration.
It’s very easy to get carried away here with loads of different pedals, but my advice is to start small and think about the essentials. It’s impossible to tell you which pedals you need because it really depends on the type of player you are the style you’re going for. Also, some amplifiers have built-in effects that you also may want to utilise.
Here are the main types of effects pedals:
Utility
- Buffer: these preserve your guitar’s tone throughout the signal chain to avoid you losing treble frequencies which can happen when using lots of pedals or long cables.
- Tuner: allows you to tune your guitar and silence the entire rig (very usually whilst on stage).
- Noise gate: removes feedback, humming and hissing from the signal chain.
- Volume: useful to change volume quickly mid-song.
- Looper
Gain
- Fuzz
- Distortion
- Overdrive
Specific Effects
- Modulation (phaser, flanger, tremolo, chorus, vibe and tremolo).
- Time-based (reverb and delay): these add ambience and are used in pretty much every genre.
Other Useful Effects
- Compression: these add sustain and smoothen the tone to make it sound more polished and professional.
- Boost: great for switching between rhythm and lead. Can be used to add a clean or dirty boost.
- EQ: allows you to shape the tone by altering the bass, mids and treble.
- Wah: unique effect popularised by Jimi Hendrix.
Check out my list of the 5 best effects pedals to buy first.
Which Do I Need?
This is a tough one. Pedal boards are unique to each player so the pedals that I deem essential, might not be suitable for you. However, here are a few points to consider.
- Overdrive and distortion pedals are used on most pedalboards. They allow you to switch from clean to dirty tones quickly, or can be used to add higher quality gain than your amp may be capable of producing.
- Time-based effects, in particular reverb, are used in most songs.
- Some famous guitarists use modulation/ wah pedals to create a specific tone, so consider getting on if you want to achieve the same effect.
- Boost pedals are very useful for players who want to perform a lot of solos.
To round off this section I wanted to list 5 pedals which I think are “essential” for different styles. Remember that this is purely my opinion and my list is very likely not going to be identical to someone else’s!
Most Versatile Rig:
- Reverb
- Delay
- Overdrive/ distortion
- Wah
- Phaser
Lead/ Rhythm Switching:
- Boost
- Overdrive/ distortion
- EQ
- Reverb
- Compression
Heavy Metal Rig:
- Overdrive
- Distortion
- Compression
- Reverb
- Delay
Here are some of my favourite effects pedals with links to each of them on Amazon so you can check current prices:
- Overdrive: Ibanez Tube Screamer TS9
- Overdrive/ Distortion All-in-One: Boss OS-2
- Compression: Keeley Compressor Pedal Plus
- Reverb: Boss Digital Reverb
- Phaser: MXR M101 Phase 90
- Wah: Dunlop Cry Baby
My First Pedal: Ibanez TS9 (image links to Amazon)
Multi-Effects Pedals?
Another good space saving and cost-effective option is to use multi-effects pedals. For example, if you want more modulation effects, have a look at an all-in-one phaser, flanger, chorus and tremolo pedal. They are usually a bit larger and more expensive than individual pedals, but miles smaller and cheaper when compared to purchasing the four pedals individually.
Check out my comparison between individual effects and multi-effects pedals to decide which is the right option for you.
Guitar Center have a huge range of effects pedals at great prices so make sure you check them out if you’re in the market for one. Here’s a link to take you directly to Guitar Center’s effects pedal range so you can check for current deals.
Choose the Style of Pedalboard
As well as choosing what size pedalboard you need, you also need to consider the style.
There are three main types of effects pedalboards:
- Angled: these allow you to mount your power supply and cables underneath to keep it neat and organised, and leaves a larger top surface for the pedals. The angle also makes it easier to step on the back pedals due to the added height.
- Flat: low-profile, cheaper and a good option if you’re using a single row. Sometimes you can mount the power supply and cables underneath but it depends on the height of the board and the design.
- Cases: good option if you want portability for gigging or to tidy your board away and keep the room clutter free.
Here’s an image of each type which links to Amazon.

Angled (by AxcessAbles)

Flat (SKB PS8 Pedal Board)

Case (Boss BCB-90X)
| Factor to Consider | Best Board Style |
| Space Utilization | Angled |
| Best Access to Multiple Rows | Angled |
| Price | Flat |
| Portability | Cases |
Here are some Amazon links to options within each style so you can compare prices.
Angled Pedalboards:
- Small: GOKKO Board
- Medium: Ghost Fire
- Large: Soyan Extra Large
Flat Pedalboards:
- Small: Pedaltrain Nano
- Medium: Pedaltrain Classic Jr
- Large: Pedaltrain Pro
Cased Pedalboards:
- Small: Boss BCB-30
- Medium: Boss BCB-60
- Large: Boss BCB-90X
DIY Pedalboard
You can also make your own pedalboard to save some money. It’s not that difficult and gives you total freedom over the size and shape of the board. You’ll just need some plywood and some screws.
Check out this video demonstration on YouTube.
Consider the Power Supply
Now let’s take a look at how you will actually power the pedals.
There are different options to do this, but first you need to consider three factors relating to your pedals:
- Voltage: most pedals run on 9V but some run on 18V or 24V. You need to make sure the voltage is equal to the pedal’s requirement for it to work and avoid damage.
- Current: most commonly the current you’ll need is 100mA however some pedals require more than this so make sure you check first.
- Polarity: most run on centre negative polarity but check this. centre positive will require an adapter.
All three pieces of information will be located on your pedal and it’s essential you get a power supply to match them.
Types of Power Supply
There are two options to choose from here:
- AC Adapter and Daisy Chain method
- Power Brick (DC Power Supply)
The first option, involves plugging an AC adapter into the mains and then using a daisy chain which splits this power supply into different outlets (usually 5) which can all be plugged into the pedals to power them. The second option, involves using a power brick which again connects to the wall, but uses separate cables to plug into each pedal.
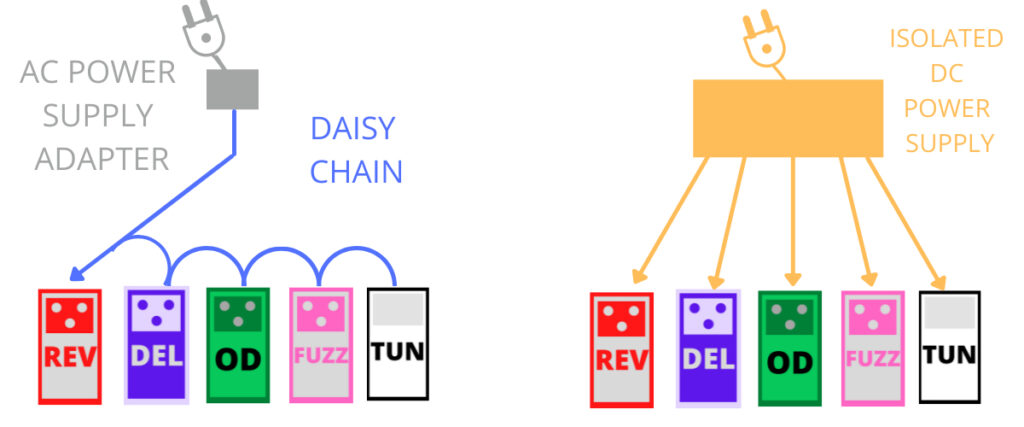
The daisy chain option is cheaper and compact (because you don’t need to mount it onto the pedalboard), however it makes the chain more susceptible to background noise such as humming and hissing because the power supply to each pedal is not isolated.
With power bricks, you can either get isolated versions, or non-isolated versions. Non-isolated power bricks suffer from the problem described above, but isolated DC power supplies avoid this issue and produce better audio quality. The drawback, is that isolated DC power supplies are pretty expensive.
| AC Adaptor and Daisy Chain | DC Power Supply |
| Inexpensive | More expensive |
| Compact | Larger |
| Noisier (non-isolated outputs) | Quieter (if using isolated outputs) |
You can use 9V batteries to power your guitar pedals, however this quickly gets very expensive and isn’t viable for most players, hence why many choose to go for a dedicated power supply instead.
Here are some Amazon links and images (which also link to Amazon) of two of the most popular options.


I’ve written a full guide explaining the different kinds of power supplies you can use for guitar pedals so check it out if you want to find the best option for you.
Get Some Cables
Almost there! The last thing you need to actually purchase is the cables to connect your guitar pedals to one another.
There are two options to connect guitar pedals to each other in a pedal board: using patch cables, or a cable kit. Patch cables are cheap and quick to setup however, they limit the different positions you can place the pedals in on the board. Cable kits are more expensive but offer more placement flexibility.
Cable kits are a kind of DIY option which allow you to use different cable lengths to connect pedals to one another. This is really useful if you have more than one row on your pedal board. They can also make your board look neater because you won’t have any excess cables.
There are two kinds of cable kits: solderless and soldered. If you’re comfortable with soldering, then get this kind of kit because the connections will usually be better quality. However, the solderless kits are really useful if you want something really easy to set up.
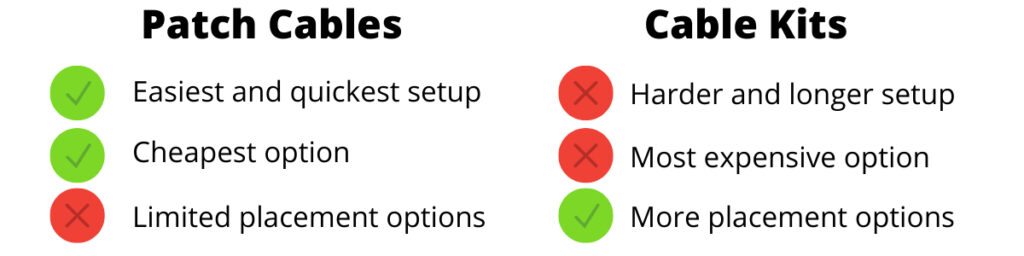
You can get a few designs of patch cable, the two most common being the U-shaped and the coupler. The U-shape cable has a wire whereas the coupler just consists of metal so looks a bit cleaner. The couplers come in Z-shape and straight designs.
Patch Cables
Here are images and links to some great options on Amazon (images also link to Amazon).


Cable Kits
Here are images and links to some great options on Amazon (images also link to Amazon).


Put Your Pedalboard Together
Onto the final step! Now you’ve got all your equipment, all you need to do is put everything together.
Before you actually order your pedals, you can actually apply Velcro to your board and to the back of each pedal. This way, your pedals will stay in place. Some pedals include velcro and others aren’t really designed for it.
Quick Tip: put the loop (soft side) of the velcro onto the board and the hook (coarse side) onto the pedal. Dust will gather more frequently on the board, and the soft side is easier to clean to this will make sure your pedalboard stays looking fresher!
Make sure you get some decent velcro as well. Check out this Power-Grip Pedalboard Mounting Tape on Amazon if you’re looking for a high-quality option.
Ordering the pedals on your board carefully is very important because different orders actually create different sounds. I won’t go into a great deal of detail here because I actually have written a dedicated article on this topic to explain where to start and some caveats to consider.
Check out my ultimate guide to effects pedal ordering for more information.
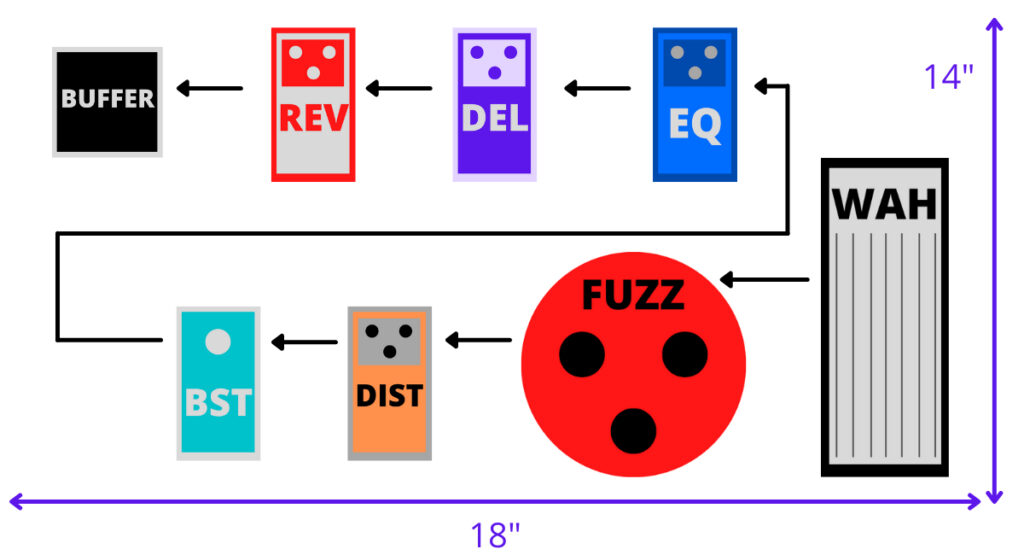
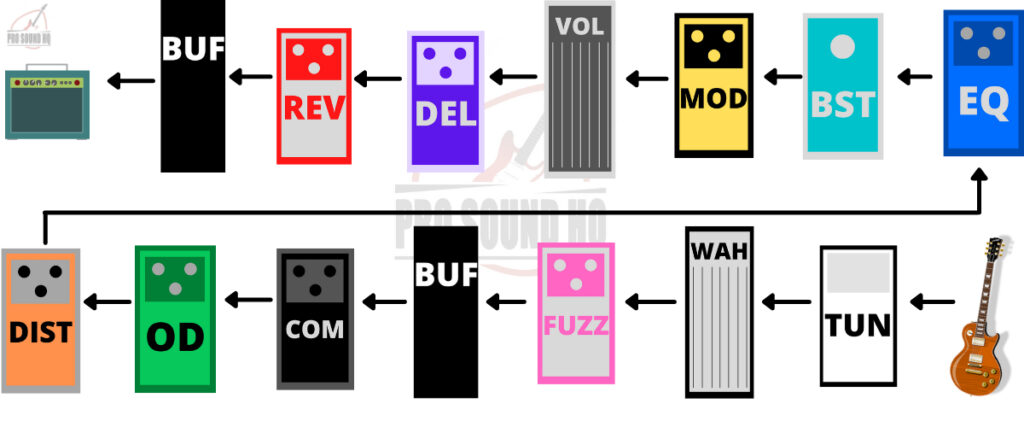
As a general rule here is the order most players go for (from guitar to amp):
- Tuner
- Wah
- Fuzz
- Compression
- Gain (overdrive and distortion)
- EQ
- Boost
- Modulation (chorus, phaser, flanger, tremolo, vibe)
- Time-based effects (reverb and delay)
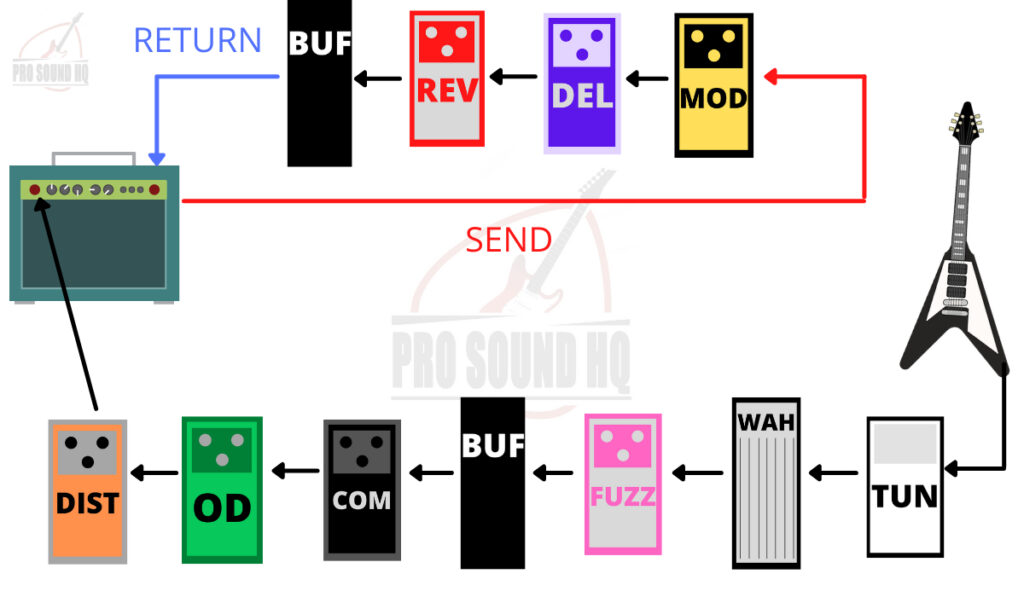
One extra thing to consider, is whether your amp has an effects loop.
This is really useful if you are using modulation and time-based effects (reverb and delay), because it prevents them from getting distorted by the amplifier. Here’s how it works.
- You can set up your pedal chain as normal.
- Plug the cable from the last pedal before the modulation/ reverb/ delay into your amp (in the input jack where you would normally plug your guitar.
- Plug a cable into the “send” output which is usually located on the back of the amp.
- Use this cable to continue your chain of modulation/ reverb/ delay effects.
- Plug the cable from your final pedal into the “return” input which is again usually located on the back of the amp.
My Recommended Picks
To round off the article, I wanted to sum up some top quality picks. Remember you’ll need the following: the board, power supply, patch cables and ideally Velcro to secure the pedals.
Pedalboard
Pedaltrain Classic Junior
- Good value for money
- Rail design allows you to secure power supply underneath
- Big enough for 6-8 pedals

Image links to Amazon
Power Supply
Voodoo Lab Pedal Power 2 Plus
- 9V power outputs
- Isolated power supply to reduce humming
Image links to Amazon
Cables
Boss Solderless Cable Kit
- Solderless design
- Allows you to organise pedals in any order
Velcro
Power-Grip Pedalboard Mounting Tape
- Allows you to secure your pedals to the board
- Enough tape for around 6 standard pedals
