Marshall amplifiers are popular amongst professionals and beginners alike, but the controls can be a bit confusing if you’re just getting started.
In this article, I’ll be explaining exactly what all the common controls actually do on a Marshall amp, how to set it up for the best tone, some example settings for different styles and common issues you may have and how to fix them.
At a Glance
Marshall amplifiers often have two channels (crunch/ OD and clean), a gain control, bass setting, mids setting and treble setting. Some Marshall amps will have additional FX (effects) settings, and may have a contour and presence setting. These allow you to shape the tone of your amplifier.
The Main Controls
Your Marshall amp will likely have around 6-8 controls you can adjust. Different amps have different controls available, so here is a list of all the most common ones you’ll find on your amp and what they actually do.
Gain
The gain setting is common on solid-state Marshall amps and adjusts the level of distortion. For heavy metal and rock, the gain setting will likely be quite high. If you’re just looking for a crunchy, crackly tone then have the gain around midway to start with. If you want a crystal clear tone, then have the gain as low as possible.
Bass
The bass setting is part of the “equaliser” or “EQ” family of settings, as are the middle and treble controls. The bass setting controls the low-end frequencies that are amplified. If you want a “boomy” kind of sound, then you’ll need a high bass setting. If it sounds a bit too heavy and muddy, then you’ll need to lower it.
Middle
The “middle” or “mids” control adjust the mid-range frequencies. Most of the time, the mids should be mid-high to make the tone sound full. Consider turning the mids up to provide depth to the tone.
Guitars are usually responsible for providing this kind of frequency in a band setting, whilst singers provide a lot of the treble and bass guitars of course provide the low-end to produce a balanced sound.
Treble
Treble or “treb” provides the high-range frequencies. Lots of treble causes the tone to be crisp and sharp, allowing separate notes to be heard more distinctly. Turn this up if the tone sounds muddy and undefined, and turn it down if you’re interfering with the vocalist or playing rhythm guitar. For lead guitar, the treble is often higher to allow it to cut through.
High Treble
High treble to the treble setting, but controls the very highest frequencies. Be careful about turning it too high or the sound may become too piercing and difficult to listen to. Some Marshall amps have treble and high-treble setting that may need carefully balancing.
FX
The FX control will allow you to select digital effects such as chorus, phaser, flanger, delay and octave. Chorus makes it sound like multiple guitars are playing, phaser and flanger add a “whooshing” sound, octaver changes the pitch and delay causes a note to be played repeatedly.
Tilt
The tilt control allows you to change the tone of the amp from normal, to favouring high treble. This changes the “voice” of the amp and is found on some Marshall amplifiers, giving it two unique tones.
Reverb
Reverb makes the guitar sound like it is being played in a very large room by creating an echo effect. This is often used to add depth and liveliness to the tone to prevent it from sounding flat and dull.
Presence
Presence is used to control the treble frequencies on some Marshall amps. A high presence setting will cause the tone to become sharper and brighter, whilst lowering it will cause it to become more mellow.
Contour
The contour control works in opposite to the mids control. Lowering the contour will cause the tone to sound fuller and provide more depth. Increasing the contour control has the same effect as lowering the mids, causing the tone to sound thinner.
Check out this guide to the contour control to learn how to dial in the best setting.
Clean/ Crunch Mode
Many Marshall amps have two settings: clean and crunch, which can be selected using a small button. “Crunch” causes the tone to sound gritty and distorted, whilst “clean” leaves the tone unaffected. These may also be referred to as the amps “channels” instead.
Pre-Amp Volume
When the amp receives the guitar’s signal, it is very weak and needs to be first amplified. The preamp control is used to do this and amplifies the volume before any effects get involved. Turning the preamp control up can cause the tone to become more distorted.
Master Volume
The master volume control adjusts how loud the output is after it has become affected by any EQ or effects settings. Unlike the preamp volume which affects the tone as well as the volume, the master volume only affects how loud the amp is, and does not change the tone.
Clean Volume
Some Marshall amps have a clean volume amp setting which is used to adjust how loud the amp is without any distortion or effects involved.
Where to Start
Now we’ve cleared up what the main settings mean, you’re probably wondering where you should start with all the controls. Here is my step-by-step method to achieving a good quality tone on a Marshall amp every time.
- Ensure your guitar’s volume and tone controls are set to maximum.
- Start with a comfortable “master volume” setting.
- Select the clean or crunch channel depending on which kind of tone you want.
- Set all the other controls to midway.
- Start with the gain, or preamp volume on very low and gradually increase it. Listen for the changes and stop when you achieve a good level of distortion before it starts sounding muddy.
- Adjust the mids/ contour control if necessary. If the tone sounds too thin, increase the mids (lower the contour).
- Adjust the treble and presence settings to make the tone sharper or more mellow.
- Adjust the bass control up or down to the desired level.
- Add any extra effects using the reverb or FX control.
The trick is to make each change one at a time, and listen carefully for the changes. This will allow you to really understand how each change affects the sound, and allows you to achieve the best tone in the fastest way possible.

Marshall Amp Example Settings (Pre-Sets)
Following the instructions above will ensure you achieve a great tone, however I understand that some of you reading this will just want to get some example settings and work from there.
Keep in mind though that these settings will sound different depending on your guitar, and the example model of amp you’re using, so take them with a pinch of salt. You can also skip ahead to the “common problems” section if you’re struggling to get it all to sound right.
I’ve also made an article with example amp settings for over 40 popular guitar songs here to help you sound more like your favourite players.
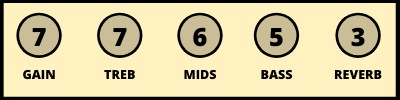
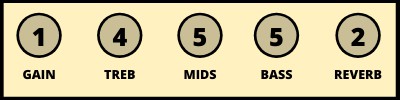
Rock Amp Settings
- Gain: 7
- Treble: 7
- Mids: 6
- Bass: 5
- Reverb: 3
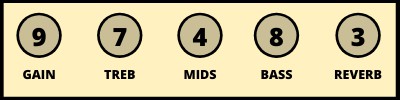
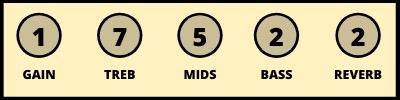
Metal Amp Settings
- Gain: 9
- Treble: 7
- Mids: 4
- Bass: 8
- Reverb: 3
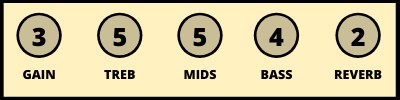
Blues Amp Settings
- Gain: 3
- Treble: 5
- Mids: 5
- Bass: 4
- Reverb: 2
Country Amp Settings
- Gain: 1
- Treble: 7
- Mids: 5
- Bass: 3
- Reverb: 2

Clean (Warm) Amp Settings
- Gain: 1
- Treble: 4
- Mids: 5
- Bass: 5
- Reverb: 2
Clean (Bright) Amp Settings
- Gain: 1
- Treble: 7
- Mids: 5
- Bass: 2
- Reverb: 2
Don’t forget to check out these amp settings for over 40 popular guitar songs here to help you sound more like your favourite players.
Fixing Common Problems
If you’re still struggling to get your amp to sound exactly how you want it to, then take a look at these common issues and how to solve them easily. Remember, make only one adjustment at a time to ensure you identify the problem more easily.
Muddy and Muffled Tone
- Decrease the bass
- Increase the treble
- Decrease the reverb
- Decrease the gain
- Increase the presence
Thin and Brittle Tone
- Increase the mids
- Lower the contour
- Increase the bass
High Feedback
- Decrease the gain
- Decrease the master volume
- Position the amp in front of the guitar
- Position the amp and guitar as far away from each other as possible
Too Sharp and Harsh
- Decrease the treble
- Decrease the presence
- Increase the mids
- Use the neck or middle pickup instead of the bridge pickup on your guitar
Here are some more articles you might find useful:
Hi,
Any chance you could do a Roland Micro Cube amp settings?
With some examples of how to use it to sound like Beatles, Stones, Led Zep etc?