Using effects pedals is the best way to take your tone to the next level, but the setup can be a little confusing if you’ve never used one before.
I’ve designed this article to explain the process of setting up and using pedals in the clearest way possible and will start by guiding you through setting up a single pedal, how to use the different controls and then how to use multiple effects pedals.
Contents:
- How to Power Guitar Pedals
- How to Connect a Pedal to Your Guitar and Amp
- Pedal Controls
- How to Use Multiple Guitar Pedals
- Best Pedal Chain Order
- How to Use an Effects Loop
How to Power Guitar Pedals
There are three ways you can power guitar pedals:
- Using a battery
- Using an AC adapter into the mains
- Using a DC power supply
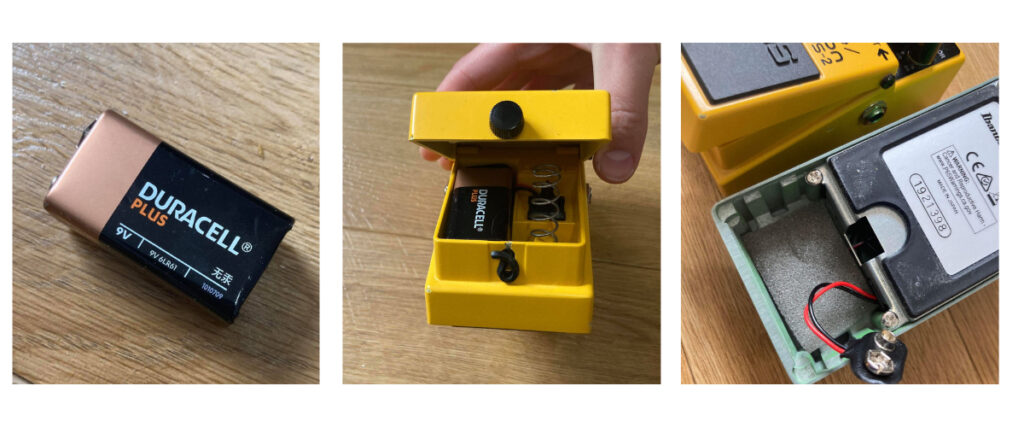
Option 1: Battery
If you’re just using a single guitar pedal then using a battery is an easy way to get started. You need to make sure the voltage is equal to the pedal’s requirement for it to work and avoid damage.
Most pedals require a 9V battery, but some need an 18V or 24V battery so make sure you check this on the back of the pedal or on the manufacturer’s guide.
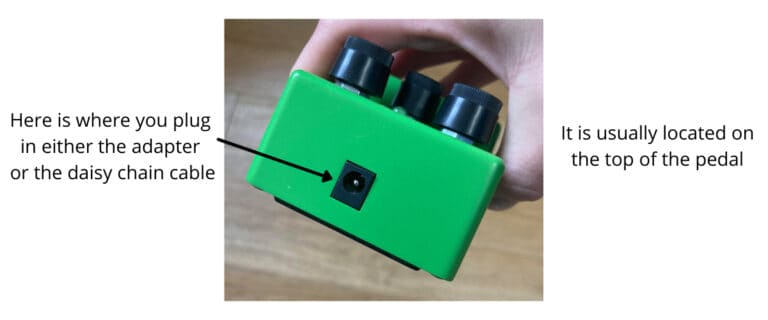
Option 2: AC Adapter
Effects pedals can be plugged into the mains but only if you use an AC adapter. This is because the AC power that comes out of the wall is too strong for a guitar pedal so the AC adapter will convert it into DC power so the voltage drops to a suitable level.
Many pedals come with this AC adapter already, but otherwise you can purchase one like this on Amazon.
If you are using multiple pedals you can get an AC adapter and daisy chain splitter. Here is a link to the Sovvid Guitar Pedal Power Supply on Amazon
Option 3: DC Power Supply
DC power supply bricks (in particular isolated DC power bricks) are the best option if you are powering multiple pedals and want to minimise background noise as much as possible. However, they are quite expensive so you may just want to go with either batteries or a daisy chain splitter with AC adapter if you’re just getting started and only using a few pedals.
Here is a link to the Voodoo Lab Pedal Power 2 Plus Isolated Power Supply on Amazon.

Image links to Amazon
I’ve written a complete guide to powering guitar pedals which includes all the pros and cons and detailing instructions on how to use each method if you’re looking for more information.
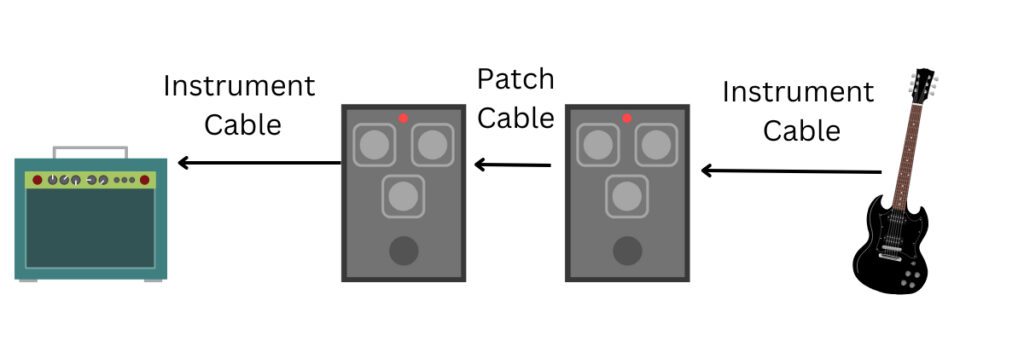
How to Connect Guitar Pedals
Guitar effects pedals should be placed between the guitar and amplifier so the chain goes like this (read from right to left as the input for guitar pedals is on the right and the output is on the left).
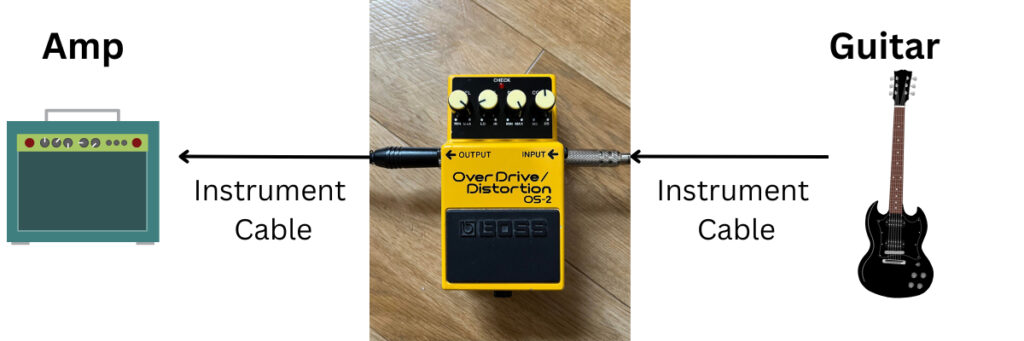
If you’re not using any pedals you’d just need one guitar cable to connect your guitar and amp, but since the pedals sit between the amp and guitar, you’ll need an extra instrument cable, so two in total.
The extra cable is exactly the same as the one you’d normally use to connect your amp and guitar, you don’t need any special kind of cable. This is because the input/ output on the pedal is the same as the output on the guitar and input on the amp amp. If you’re in need of an extra cable, here’s a link to one on Amazon.

Image links to Amazon
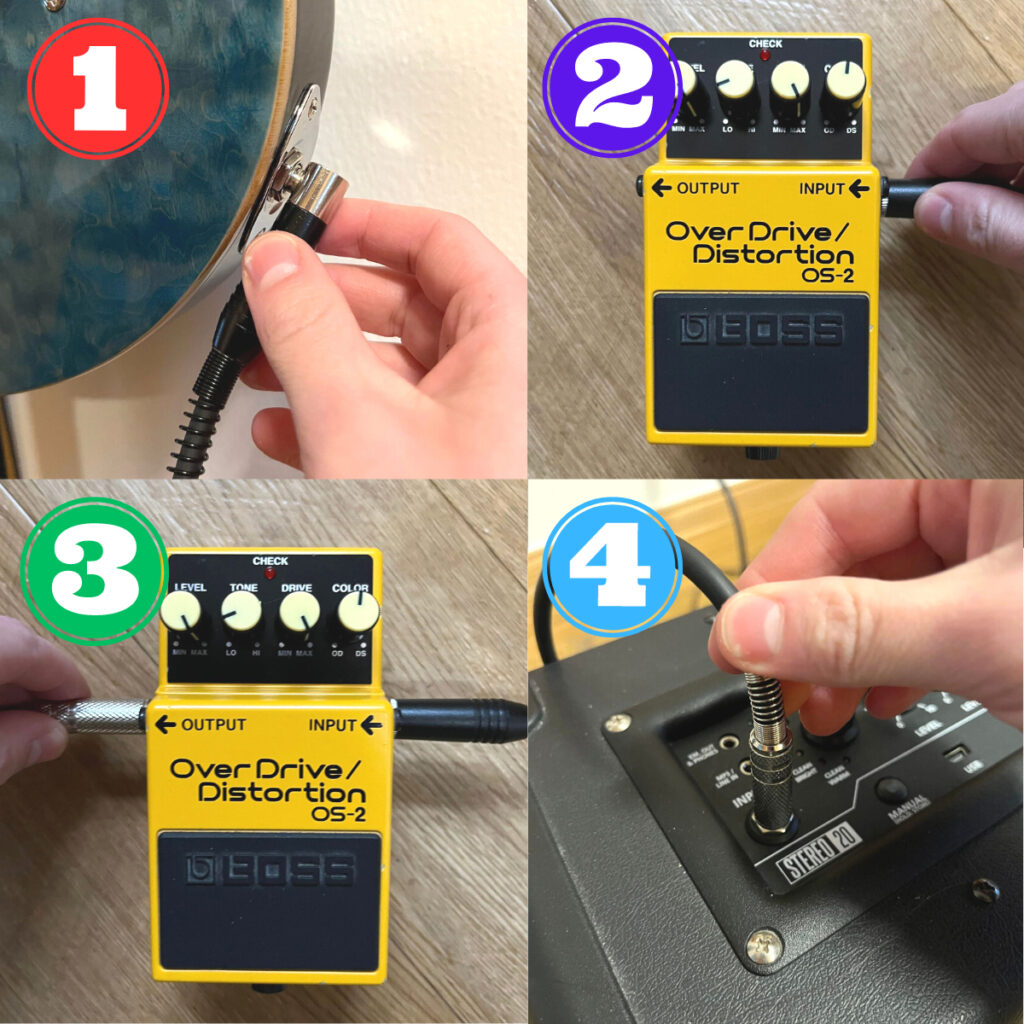
Here’s how to step everything up.
First start by turning off your amp and pedal supply if you are not using a battery.
- Plug an instrument cable into your guitar
- Plug the other end of the instrument cable into the “input” on the guitar pedal which will be on the right-hand side
- Plug the second instrument cable into the “output” on the pedal which will be on the left-hand side
- Plug the other end of the second instrument cable into the guitar amp
Once everything is connected you can turn on your guitar amp and pedal power supply (if not using a battery, in which case you won’t need to do anything) Then switch the pedal on by pressing down on it. Most pedals will have a small red light at the top so you can tell the pedal is on
Pedal Controls Explained
There are quite a lot of different types of effects pedals available and they all have different controls. In this section I’ll go through the most popular types of pedals and how to use them.
If you’re unsure what any of these pedals are used for, check out my complete guide to the different types of effects pedals for everything you need to know.
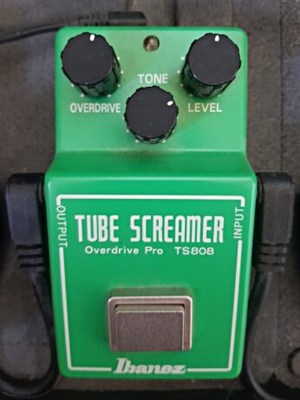
Overdrive, Distortion and Fuzz
Overdrive, distortion and fuzz pedals typically have three controls:
- Level: this adjusts the volume of the pedal
- Drive (aka gain or distortion): this adjusts the amount of overdrive/ distortion
- Tone: this adjusts how bright or warm the tone is (turning the dial clockwise will increase brightness)
Check out my complete guide to using a distortion pedal for more information.
Reverb
Here’s what the controls on a reverb pedal do.
- Mix or level: this refers to the balance between the volume of your guitar’s natural sound, and the reverb.
- Tone: this adjusts how bright or warm the tone is (turning the dial clockwise will increase brightness)
- Time/ Decay: this refers to how long the echo effect lasts.
- Attack: this refers to how quickly the reverb effect kicks in.
- Type: this allows you to change the type of reverb e.g. spring, plate etc.
Delay
- Type: this allows you to change the type of delay e.g. doubling, slapback etc.
- Time: this refers to the length of time between the sound of your guitar, and the repeated note.
- Feedback: this refers to the number of repeats the delay pedal will induce.
- Level: this refers to the volume of the delayed notes.
Check out my guide to using a delay pedal for more information.
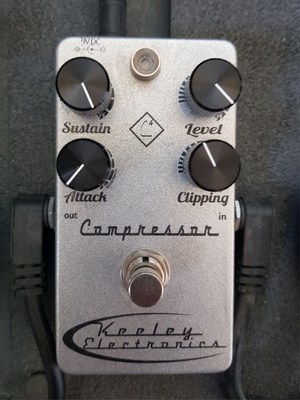
Compression
Here are the most common controls found on compressor pedals.
- Threshold/ Level: This refers to the volume at which the compressor pedal will start to compress the signal
- Ratio/ Limiter: this affects how much the volume is decrease by the compressor.
- Attack: controls how long the note is heard before the compression picks in.
- Release: controls how long the note is compressed for.
- Blend: allows you to adjust how much of the compressed and uncompressed sound you hear.
- Sustain: refers to how long the note rings out for.
- Tone: this adjusts how bright or warm the tone is.
Check out my complete guide to compression pedals for more information.
EQ
EQ pedals typically have different frequency bands which you can either boost or cut. The lower frequencies are the bass frequencies, then you have the mids, and then the higher frequencies are the treble frequencies.
- Treble frequencies (2000-10000 Hz): turning these up will make the tone more crisp, clear and defined, but having them it too high can sound too harsh.
- Mids frequencies (500-2000 Hz) turning these up will create more depth and allow the guitar to cut through the mix more, but having them too high can make the guitar sound too dominating.
- Bass frequencies (60-250 Hz): turning these up will make the tone fuller and warmer, but having them too high can cause the tone to be too muddy.
Wah
Wah pedals are operated by pressing down on the pedal.
- Open position: no effect
- Closed position: creates a filter effect
By rocking back and forth on the wah pedal you get a sweeping sound. A good example of this is in “Voodoo Child” by Jimi Hendrix.
Modulation
Modulation effects create a specific and unique sound. There are 5 main types of modulation effects:
- Phaser: these create a wobbling effect
- Flanger: these create a whooshing effect
- Chorus: makes it sound like more than one guitar is being played at the same time
- Tremolo: create changes in volume
- Vibrato: create changes in pitch
Check out this YouTube video to hear the different types of modulation effects in action.
Some modulation pedals just have one effect (e.g. phaser) and others may have several built-in which you can activate in isolation or in combination.
Modulation effects typically have the following controls:
- Speed/ rate: adjusts how frequently the modulation effect occurs
- Level: adjusts the volume of the pedal effect
- Depth: adjusts how dramatic the effect sounds
Volume
A volume pedal affects the signal fed from your guitar into your amp. It can be pushed downwards or rocked backwards to operate it. Pressing your toe down will increase the volume whilst rocking back on the heel will decrease it.
Check out my complete guide to using volume pedals for more information.
How to Connect Multiple Pedals
If you want to use multiple types of effects pedals then you’ll need to connect them together using patch cables. These are short cables which have the same input/ output as a regular instrument cable, but can be used to connect pedals to each other without having loads of excess cable.
Here is a link to some patch cables on Amazon.

Image links to Amazon
You’ll also need to power all of your pedals.
If you’re just using a couple of pedals then using either batteries or an AC adapter with a daisy chain splitter (Amazon link) as discussed earlier in the article will be fine.
However, if you are powering 3-4 pedals or more, then I’d recommend using a an isolated DC power block. The power block is plugged directly into the mains, and then has inputs for each of your pedals. It ensures you don’t get excessive background noise and all your pedals have enough power.
Here is a link to the Voodoo Lab Pedal Power 2 Plus Isolated Power Supply on Amazon.
Alternatively, you can use a pedalboard with a built-in power supply which just connects to the mains. If you’re using a lot of pedals and need to organise them without just laying them on the floor, then a pedalboard is the ideal option.
Check out my complete guide to pedalboards for everything you need to know.

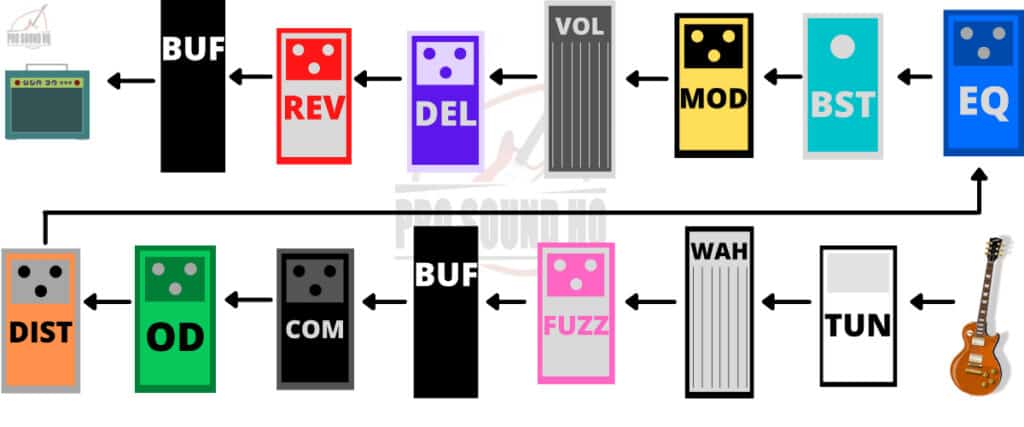
Best Pedal Chain Order
If you are planning on using multiple pedals then you’ll also need to consider the order you put them in. Since the pedals run in a chain from the guitar to the amp, the order you have them in will affect the tone.
For example, if you place your compression pedal at the very start of your chain, then only the sound of your guitar will be affected, and not the rest of your pedals.
Typically tuner pedals go at the start of the chain (closest to the guitar), followed by wah then fuzz. Dynamic-effects (e.g. compression) should go next, and then overdrive and distortion. EQ and modulation pedals should go next, and reverb and delay should go last in the chain.
Experimenting with pedal orders is definitely encouraged, but if you’re looking for a good place to start, here’s how I organise my signal chain. Note: you don’t need every pedal to use this order!
Check out my ultimate guide to the best effects pedal order to learn everything you need to know.
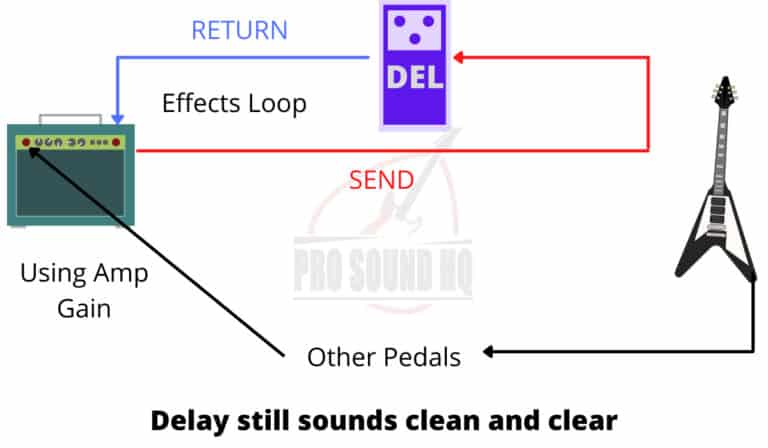
FX Loops Explained
If your amplifier has an FX loop then it’s definitely worth considering which pedals you want to put in it.
Guitar amps have two main sections: the pre-amp and power-amp. The pre-amp stage is responsible for creating a lot of the distortion/ overdrive if you are using your amp to get your gain rather than keeping the signal clean instead.
When you place your pedals in the usual order (before the amplifier), they will always be before the preamp stage, meaning they will get distorted by the amplifier.
Some effects don’t sound good when distorted such as reverb, delay and modulation effects.
This is where the FX loop comes in.
This allows you to place some pedals after the preamp stage, rather than before it. This keeps effects like reverb and delay nice and clear instead of muddy and distorted.
Check out my guide to using an FX loop for more information on how to use it and which pedals should go in it.