When you get any new guitar, whether it’s your first, or you’re tenth, it can take a bit of time to get used to the controls. The Les Paul is a little more complicated than most electric guitars, because it has two tone and volume controls, whereas most other models only have one of each.
So how do you use all the different controls properly to get the best tone?
In this article, I’ll go through an in-depth, step-by-step guide to using your Les Paul’s controls so you know exactly how to get the best out of your new guitar. So let’s get started!
The Quick Answer
The Les Paul has three main control types:
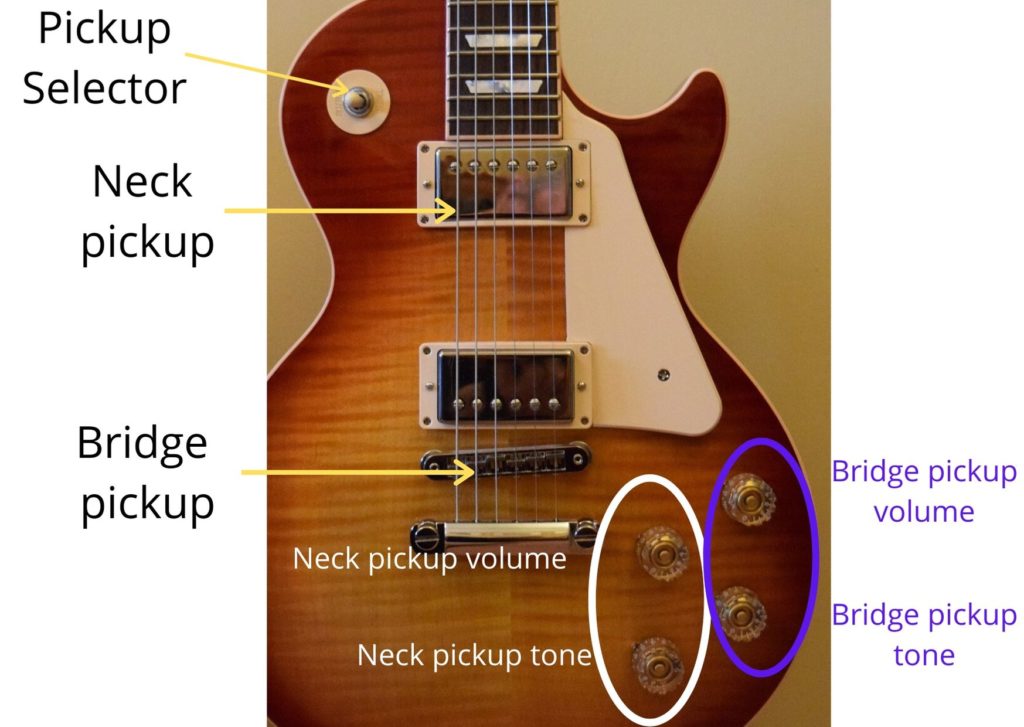
- Pickup selector
- Tone controls
- Volume controls
The pickup selector allows you to either activate the bridge or neck pickups in isolation, or in combination. The tone controls allow you to adjust the brightness of your tone. The two volume controls which allow you to adjust how loud the guitar is. There are two volume controls and two tone controls, so a set for each pickup.
Understanding a Les Paul's Controls
Okay, so let’s go into a little more detail about what each of these different control types actually do.
Pickup Selector
This allows you to choose which pickup is activated. The Les Paul has two pickups, one near the bridge and the other near the neck. The position of these pickups dramatically affects how they sound.
The bridge pickup sounds sharper and brighter, whilst the neck pickup sounds warmer and more mellow.
Often, the bridge pickup is used for lead guitar and heavier styles of music with more gain because it allows you to cut through the sound of the rest of the band.
The neck pickup is commonly used for rhythm guitar and clean tones because it’s less harsh and bridge.
Check out this post on the difference between bridge and neck pickups to learn more.
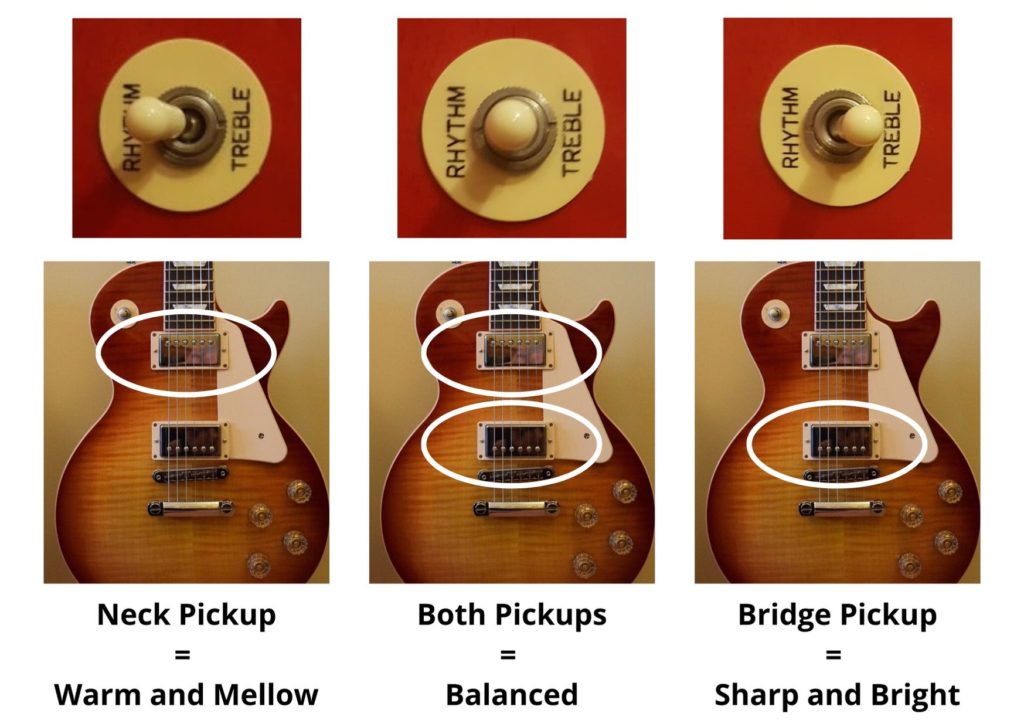
Okay, so why does the Les Paul has a three-way pickup selector then? This is because you can either use the neck pickup alone (up position aka rhythm), the bridge pickup alone (down position aka treble) or both pickups together (middle position).
So to sumarise:
Rhythm (up) Position = Neck Pickup = Warm Sound
Treble (down) Position = Bridge Pickup = Bright Sound
Middle position = Both Pickups = Balanced Tone
Tone and Volume Controls
The Les Paul is a little different than most electric guitars, because it has two tone knobs and two volume knobs.
One set of tone/ volume controls, is used to control the neck pickup, and the other is used to control the bridge pickup.
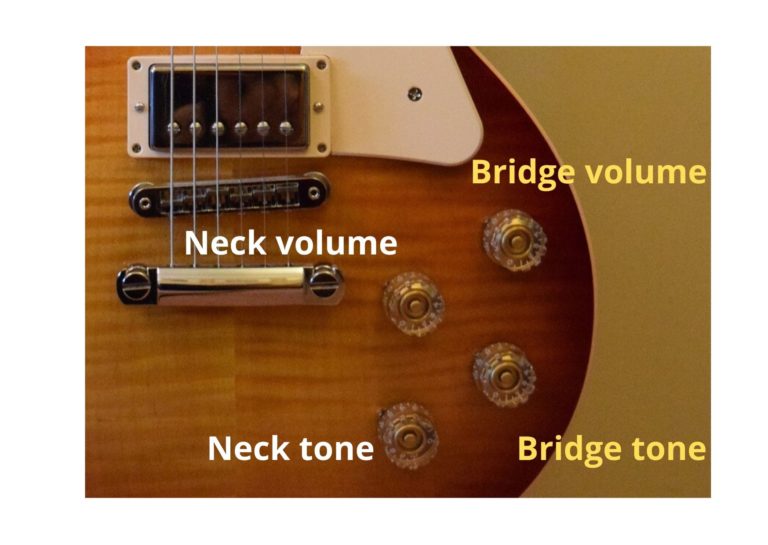
So if you were to stand with the guitar and look down, the top two knobs control the neck pickup, and the bottom two control the bridge pickup.
The tone control is used to adjust how much treble output the pickup has. This simply means, how sharp and bright it sounds. Having more treble increases clarity and note separation, but too much can make it sound a bit harsh.
If you have the tone control on full, all the treble will be sent to the amp. If you decrease the tone control, then less treble is sent to the amp.
The volume controls are used to adjust how loud each pickup is of course. But they also can affect the tone as well. If you decrease the volume, then you’ll lose some of the treble, similar to what happens when you decrease the tone control.
How to Use the Controls
Okay, so now you know what each control does, how do you actually use them to get the best tone.
Well, one of the greatest things about a Les Paul, is the fact that you have independent tone and volume controls for each pickup. This allows you to use them in many different ways, for several effects and situations.
So, with that in mind, let’s talk through the three best ways to use a Les Paul’s controls.
- For distinct rhythm and lead tones
- For separate clean and crunch tones
- Blending the tone of each pickup
Want to be better guitar player faster? Check out this 14 day free-trial for Guitar Tricks to access over 11,000 lessons and 1000 songs to become a better player today.
1. For Distinct Rhythm and Lead Tones
Let’s start with the simplest way to use a Les Paul’s controls, and this is by creating separate rhythm and lead tones.
If you’re playing a song that requires you to play chords and rhythm sections in the verses and choruses, but then you need to play lead sections for example, when soloing, then you can use the LP’s controls to create two different tones.
For rhythm playing, your tone should be warm and mellow, so it doesn’t overshadow the singer. For lead playing, your guitar should sound brighter, sharper and louder, so your solos can be heard properly.
If you want to learn more about this topic, then check out this article I’ve written on the 3 differences between rhythm and lead guitar.
So how do you dial in these separate tones.
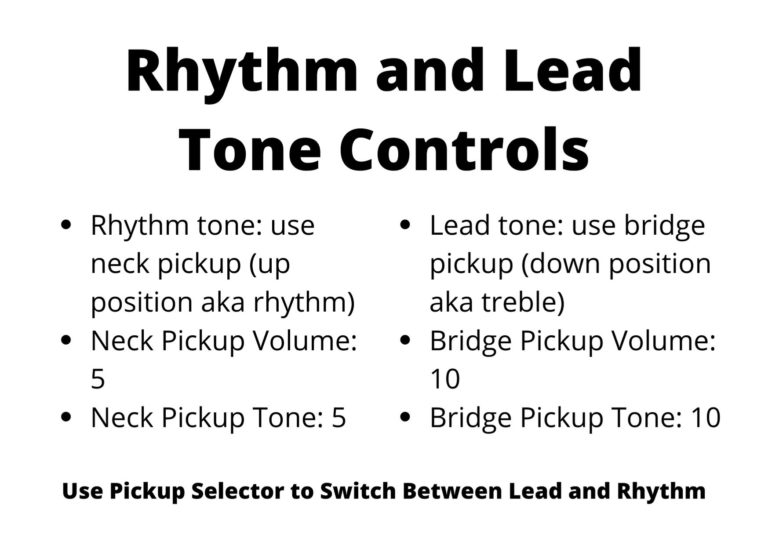
For the rhythm sections, you’ll want to use the neck pickup, and have the volume and tone controls that dictate your neck pickup, turned down a bit. This will make your tone quite mellow and warm, but still quite full. This makes it good for chords, without overpowering the singer or lead guitarist.
For the lead sections you should use the bridge pickup, and have the tone and volume on full.
So, all you need to do, is switch between the pickups using the pickup selector when you need to go from a rhythm to a lead tone, and vice-versa.
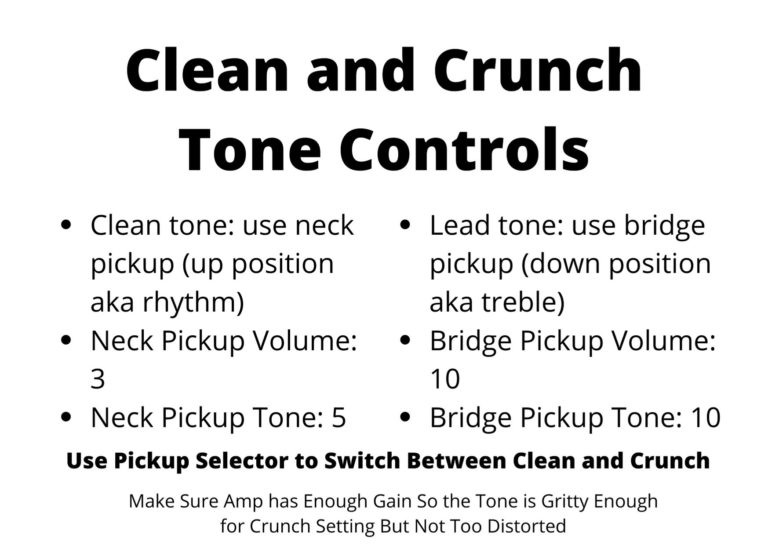
2. For Separate Clean and Crunch Tones
You can also set up the Les Paul’s controls so that you have distinct clean and crunch tones. This works in a similar way to the method described above.
Clean tones usually sound best when you use the neck pickup, and have the tone control rolled back to about halfway, and the volume control rolled back so it’s on around 3-4. This will take the distortion down a lot, even if you’re using a lot of gain on your amp. Hence, your tone will sound smooth and clean.
Crunch tones work best when you use the bridge pickup. It makes it sound brighter and sharper and gives it more bite so it actually sounds gritty and crunchy. You should have the volume and tone controls on full.
Make sure your amp is set up so that you have just enough gain to make it sound gritty, but not so much that it sounds very distorted. You’re just looking for some snap.
3. Using Both Pickups
Finally, you can also use both pickups together to dial in a signature tone.
This way of using your Les Paul can’t be described step-by-step, because it really depends what kind of signature tone you’re after. However, there are a few tips to help you get started.
- Use the middle position of your pickup selector to activate both pickups.
- Turn the volume and tone up to full for both pickups.
- To get a warmer tone, try reducing the volume on your bridge pickup.
- To get a brighter tone, try reducing the volume on your neck pickup.
- Then to tweak the brightness/ warmth even further, start using the tone controls.
- Start with one tone control at a time, make a small adjustment, play a few notes or chords, and then tweak again.
This method can take a while, but it’s one of the best ways to use a Les Paul’s controls to truly dial in the perfect tone. Be patient, and have fun with it!
To really get the most out of your Les Paul, you need to make sure you dial in the best amp settings. Check out my complete guide to amp settings with plenty of examples so you can get to grips with your setup.
If you really want to improve your guitar playing then I recommend checking out Guitareo. You can sign up for a free 30-day trial here to get access to all the online lessons and start making real progress today
So there you go! That’s how to use the controls on a Les Paul! I hope you’ve found this article helpful, thanks for reading. Here are some other posts you might find useful: