Delay is one of the most types of FX pedals available and is seen on pretty much every famous guitarists pedalboard. They’re highly useful but can be a bit confusing to operate at first, so I’ve created this complete guide to help you set up and get the best out of your delay pedal.
Contents:
- Set Up (Power and Connection)
- Delay Pedal Controls Explained
- Delay Pedal Signal Chain Placement
- Different Ways to Use a Delay Pedal
Setting Up a Delay Pedal
I won’t go into the actual set up too much here as I do have separate articles which explain it in more detail (linked below), but here are the basics to get you up and running.
There are two things you need to do before you can activate any pedal:
- Power it
- Connect it
To power a delay pedal you have three options.
- Use a battery. Some delay pedals will take an internal battery (usually 9V or 18V) which can be used the power it. The drawback of this method is that the battery typically will only last around 5-10 hours)
- Use an AC adapter to connect it to the mains. A pedal cannot be plugged directly into the mains so an AC adapter must be used instead. This works well if using a single pedal but the audio quality will be reduced if you are powering multiple pedals this way.
- Use an isolated DC power supply brick. This is the ideal method to get the best audio quality but it is the most expensive option.
I’ve written a complete guide to powering guitar pedals which includes all the pros and cons and detailing instructions on how to use each method if you’re looking for more information.
In terms of connecting your pedal, it should go between your guitar and amplifier. You will need:
- One instrument cable to connect your guitar to the input jack on your pedal
- A second instrument cable to connect the amplifier to the output jack on your pedal
Instrument cables are the type of cable you usually use to connect your amp to your guitar. Here’s a link to one on Amazon if you need a second cable.

Check out my complete guide to using guitar pedals for more information on the setup and connection
Delay Pedal Controls Explained
Here is a list of the most common controls that you’ll find on a delay pedal:
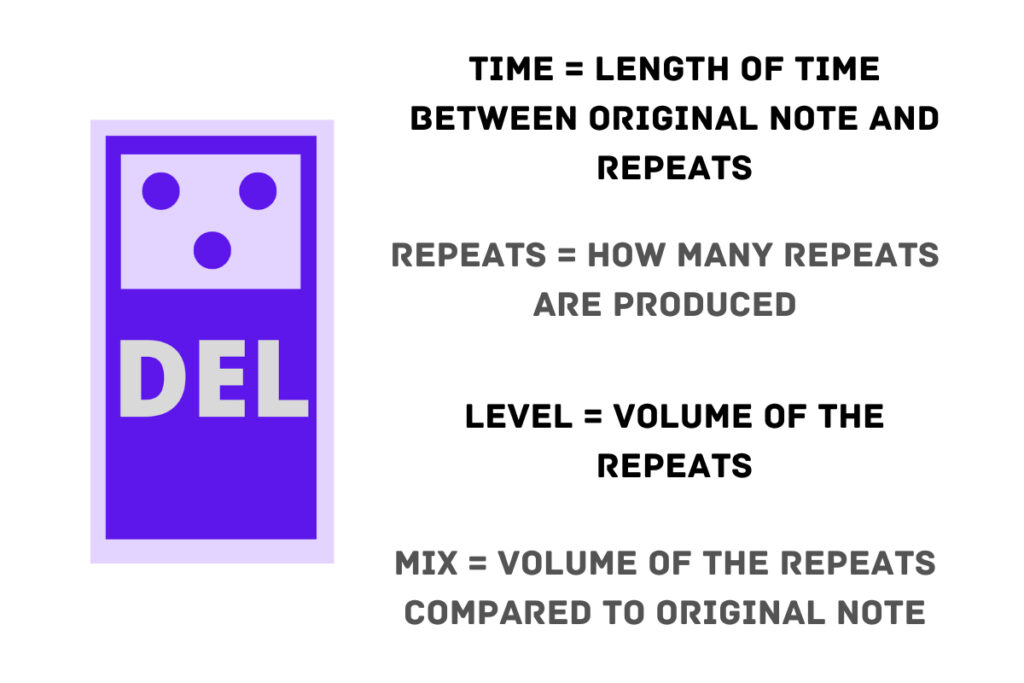
- Time (aka echo or delay)
- Repeats (aka intensity, feedback or regeneration)
- Level (aka volume)
- Mix (aka blend)
- Mode (aka type or function)

Time
The “time” control on a delay pedal allows you to adjust the length of time between the initial sound of your guitar, and the repeated note. On some delay pedals this control will be called “echo” or “delay” instead. You can use this control to adjust the rhythm of your repeats to the desired level.
Repeats
The “repeats” control on a delay pedal allows you to adjust the number of repeats the delay pedal produces. On some delay pedals this control is called “intensity”, “feedback” or “regeneration” instead. Most delay pedals allow you to adjust the number of repeats from just a single repeat up to over 10 repeats in a lot of cases.
Level
The “level” control allows you to adjust the volume of the delayed notes. By turning the level up, you will hear the repeated notes more loudly, and by turning the level down you will have a more subtle effect as those repeats will be a lot quieter.
Mix
The “mix” control is similar to the level control but instead adjusts the volume of the delayed note in proportion to the volume of the original note. For example, by having the mix control set to halfway, the delayed note would sound half as loud as the original note played. This control is sometimes called “blend”.
Mode
The “mode” (also known as “type” or “function”) control allows you to quickly switch between different types of delay. The most common types of delay are:
- Analogue: this produces warmer and more textured repeats
- Digital: this produces very sharp and clear repeats
- Tape: sounds warmer and less accurate than digital delay but clearer than analogue delay
- Slapback: this produces short, percussive repeats
Not every delay pedal has different modes, and some which do will have a tonne of different types of delay built-in. I’d just advise experimenting with these modes to see which you like the sound of the most.
Delay Pedal Chain Placement
If you are just using a delay pedal and are not planning on using any other effects pedals, then don’t worry about this section.
However, if you are using other pedals, for example wah, reverb, overdrive, modulation etc., then you need to consider the order that you put them in. This is known as the signal chain.
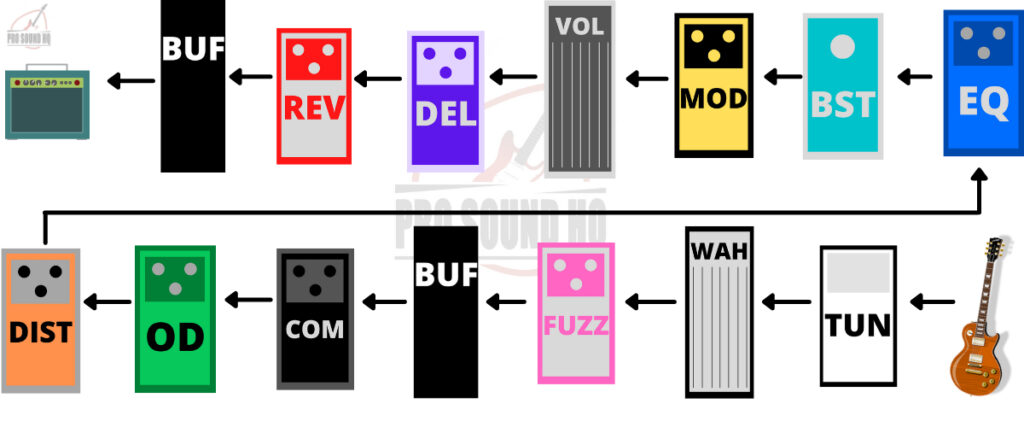
Since the pedals are all connected in a continuous chain from the guitar all the way through to the amp, the order you put them in will affect the overall tone, since each pedal is always affected by the pedal that is placed before it in the chain (closer to the guitar).
Time-based effects such as delay and reverb should go at the end of the pedal chain (closest to the amplifier).
This means that delay pedals should go after any of the following:
- Tuner
- Wah
- Fuzz
- Compression
- Overdrive/ Distortion
- EQ
- Boost
- Modulation e.g. phaser, flanger etc.
This allows the delay pedal to subtly shape the tone without any other effects interfering. Putting delay pedals earlier in the chain will make things sound much messier.

Which Order Should Reverb and Delay Go In?
If you are using both reverb and delay pedals, they can go in either order depending on the type of effect you are trying to achieve.
Most guitarists like to put the delay pedal first (closest to the guitar), followed by the reverb pedal, however this is certainly up for debate:
- If you put your delay pedal before your reverb, you would be creating a series of repeated notes, and then giving them more depth and liveliness. This tends to sound the most natural.
- If you put the reverb pedal before the delay pedal, then you’ll be adding depth and presence, and then creating a series of repeated notes of this tone. This creates bigger washes of sound.
Check out this article on the best order for delay and reverb pedals for more information.
Should a Delay Pedal Go in the FX Loop?
If the amp has “send” and “receive” jacks on the back, then it will have an FX loop. The FX loop allows you to place pedals after the pre-amp stage of the amplifier but before the power-amp stage in the signal chain.
The result, is that you can place certain effects after distortion or overdrive in the signal chain if you are using your amp to produce these kinds of tones (instead of a distortion or OD pedal).
This is very useful because some effects sound much better if they are placed after any gain is added.
If your amplifier has an effects loop, you should typically put the delay pedal into the loop, rather than before the amplifier. This will result in the cleanest delay effect and stop it getting muddied up by any distortion or overdrive.
Without FX Loop

With FX Loop

Check out my article explaining FX loops and how to use them for more info.
Different Ways to Use a Delay Pedal
Now we know all the basics, let’s go through some different and unique ways you can utilise your delay pedal to achieve some interesting tones.
Slapback Delay
One of the best ways to subtly use a delay pedal is to beef up your guitar’s tone. This is also known as “slapback delay” and is very popular in rock and country music.
To do this, use the following settings on your delay pedal:
- Time (echo/ delay): 1-2
- Repeats (feedback/ intensity): 1-2
- Level (volume): 5-6
These settings will result in a very short, sharp delay which will not be heard as repeats of the original note. The result is more depth as opposed to an obvious delay effect.
To Increase Sustain
Many lead guitarists will actually use this technique with their delay pedal to add sustain for solos.
Try the following settings:
- Time (echo/ delay): 3-4
- Repeats (feedback/ intensity): 4-5
- Level (volume): 4-5
Delay as Reverb
Delay and reverb are not the exact same type of effect, although they are both considered ambient “time-based” effects. If you don’t have a separate reverb pedal, it is possible to set your delay pedal up in a way which will sound quite close to reverb.
Here are the settings you’ll need:
- Time (echo/ delay): 1-2
- Repeats (feedback/ intensity): 4-5
- Level (volume): 3-4
These settings will result in a subtle trail after your original note which sounds very similar to reverb and serves the purpose of adding depth and life to the tone.
Dotted Eighth Note Delay
The dotted 8th note delay trick (also known as cascading delay) is very popular. It results in a repeated note that happens 3/4 the way through each beat. Think U2 and Pink Floyd, both of which use this delay technique in many of their songs.
To achieve this affect you’ll need to work the time setting required for the specific song. This is easiest with pedals which have a tap tempo function.
Check out this video for a demonstration.
