Amplifier settings and controls can be super confusing, especially for a beginner, but even for more experienced guitarists who have recently purchased a new amp. It’s hard to know what everything means, and what it does to your sound.
So in this article I’ll go through all the controls on guitar amplifiers, explain what they mean, and how they change your sound. Then I’ll jump into some presets you can try and explain exactly how to dial in the perfect tone. So let’s get started!
Basic Amplifier Controls
So let’s kick off this guide by going through all the main controls you’ll find on most amplifiers and explain what they mean. They are:
- Volume
- Gain
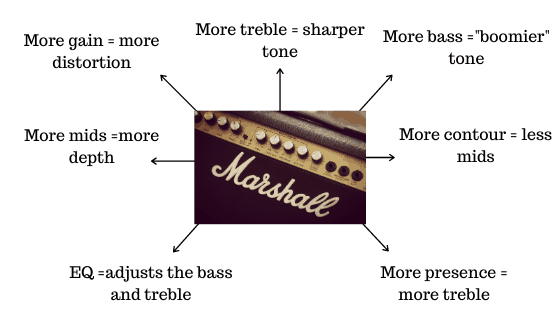
- Bass
- Mids
- Treble
- EQ or Tone
- Contour
- Presence
Looking for something more specific? I also have brand specific amp settings guides:
Volume
So this one is pretty obvious. There are usual one or two volume controls on an amplifier. If you only have one volume control, it’ll just act as a master volume control. But if you have two, then usually one is to control a clean channel, and the second is to control the distorted channel.
Gain
So to properly understand the term gain, you need to know how the amplifier works. Don’t worry, it won’t get too technical, but bear with me.
When an amplifier processes the signal that comes from your guitar’s pickups, it goes through two stages. The first stage is called the “preamp”. This is what controls the gain setting. So if you turn this up high, it causes the preamp to work harder, resulting in a more distorted tone. The second stage is the power-amp stage. This controls the overall volume.
Of course, there are cases where you’ll want a lot of gain, for example, if you’re playing heavy metal. And there are also cases where you’ll want less gain, or none at all, for example in a lot of country music.
One thing to point out though, is that often you actually need less gain than you think you will. Having too much gain can cause your tone to sound muddy. So it’s always best to start with a lower gain setting, and work up to where you need to be.
Bass
The bass control on your amplifier determines the amount of low-frequency sound you’ll hear through your amplifier. If you want to give your tone a “boomy” sort of presence, then you’ll want a higher bass setting. But if you prefer a more balanced and even tone, then set your bass to around halfway and work from their.
Mids
Mids, refers to the amount of mid-range frequencies you hear through your speaker. If you have a higher mids setting, your tone will sound more full and have more depth. A high mids setting will stop the sound of your guitar getting lost when you’re playing in a band with other instruments.
The main purpose of guitars in a band are to provide the mid-range frequencies, so it’s very rare that you should have this setting on low. On most amplifiers, you’ll want your mids setting to be on at least 4, but often around 6 for a lot of styles of music.
Treble
Treble refers to the amount of high frequency sound you hear through the speaker. Treble frequencies make your tone sound sharper and more crisp. If you want to have perfect note separation, then you’d have the treble quite high. However, if you turn it up too high, it can start to sound a bit harsh.
Usually, a higher treble setting is used for lead guitar rather than rhythm guitar. This is because lead guitar needs to cut through the mix a bit more than rhythm guitar, which generally uses a lower treble setting to sound a bit more mellow and warmer.
EQ or Tone
Some guitar amplifiers don’t have separate treble, bass and mids controls, and instead have an EQ (equaliser) or tone control. Using these controls have a similar effect to adjusting the treble and bass. If you turn the control up, then you’ll put more emphasis on the treble, making your guitar sound sharper. If you turn the tone/ EQ control down, then your tone will become more mellow.
It’s really hard to say what your EQ or tone control should be on, because it varies so much between amplifiers. So the best advice I can give you, is to start at halfway, and then slowly adjust down, and then slowly adjust back up. You should find the sweet spot you’re after if you’re patient with this.
As a general rule, you’ll want to place more emphasis on the bass if you’re playing rhythm guitar, and more on the treble if you’re playing lead guitar, but that’s a very simplistic overview.
Contour
This control is found on most Marshall amps and simply refers to the mids. However, it is actually the opposite way round to what you’d usually expect. So if you increase the contour, you will be decreasing the mid-range frequencies. And if you decrease the contour, you’ll be increasing the mids. A high contour setting sounds almost “scooped”.
Check out this guide to the contour control to learn how to dial in the best setting.
Presence
This is another control commonly found on Marshall amps and it’s used to control the higher frequencies like the upper-mids and treble. If you increase the presence, the tone will sound sharper and livelier. If you decrease it, the tone will be more mellow.
Check out this guide to the presence control to get the most out of it.
What are Amplifier Channels?
Another thing you may be wondering about your amplifier, is what the different channels do. Often you’ll see a lot of amplifiers with two channels: one that’s clean and another that’s overdriven or distorted.
You can use these to easily switch between a clean and distorted tone, but without messing with your gain setting. It’s particularly handy when you plug a foot-switch into your amp (which a lot of amps allow), to easily change between the channels.
Clean
The clean channel will have little to no gain, depending on the exact amplifier you’re using. However, on a lot of amps, you can still adjust the gain control. If you increase it, then you’ll get a kind of overdriven tone, but you won’t get thick distortion. I sometimes set my amp on a clean channel and then crank up the gain in order to get a crunchy, saturated tone.
Distorted
If you set the channel to distorted, then you’ll get a big boost of gain. This is very useful for metal and hard rock. You can then adjust the gain control in order to go from a more overdriven and crunchy tone, to pure distortion.
Number of Channels
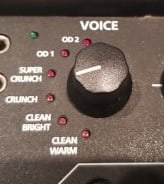
Like I said before, a lot of amplifiers have two channels, one clean and one distorted. But some have more. My practise amplifier, from the Blackstar ID Core Series, has 6 channels. Two clean (one warm, one bright), two overdriven, and two distorted.
If you really want to improve your guitar playing then I recommend checking out Guitareo. You can sign up for a free 30-day trial here to get access to all the online lessons and start making real progress today
Guitar Amp Effects
Okay, so now we’ve been through all the main control you’ll find on your amplifier, we’ll jump into some of the others you might see. Your amplifier may have all of these, only some, or not at all. Their function isn’t to adjust the tone as much as the basic controls, but to add some interesting effects.
If your amp doesn’t have these features, then you may want to look into some effects pedals to give you the same result. Check out this quick guide to guitar effects pedals to find out a bit more.
But for now, let’s get started with the most common amplifier effects:
- Reverb
- Delay
- Phaser
- Chorus
- Flanger
- Octaver
- Tremolo
Reverb
Reverb is one of the most basic effects, but it has such a big impact on your guitar’s tone. Reverb occurs naturally all the time, it’s simply caused by soundwaves reflecting off surfaces. So think about the kind of sound effect you get if you were to shout in a huge empty hall. It causes a kind of echo effect right? Well, that’s reverb.
So what does it do for your tone? Well, reverb tends to give your tone a lot more presence and depth. It’s great for loads of different situations, from adding a bit of impact to your solos, to just giving your rhythm playing a boost.
There are 5 main types of reverb. Some amplifiers allow you to switch between the types, and others simply allow you to control how much reverb you hear. Here are the main types:
- Room: this is the most subtle type of reverb. It’s almost so subtle, that if you have it on fairly low, you will really have to listen for it.
- Hall: this makes the reverb more obvious, since it’s supposed to mimic the natural reverb that occurs when you play in a hall.
- Chamber: this differs from hall reverb, because it mimics a smaller space, resulting in more clarity, and makes it sound less airy.
- Plate: this reverb type mimics the sound you get if a sound wave hits a plate of metal. This type of reverb sounds smooth and lasts for a longer time.
- Spring: this type of reverb sounds more wobbly, hence mimicking the way a spring moves. The reverb is less smooth than plate reverb.
Delay
Delay effects cause a note to be taken and repeated back. This works for both chords and individual notes. It’s a great effect to add in when you’re playing solos. However, you have to be careful with delay effects, as if you make them too prominent, your sound will become a bit of a mess.
Unless your amplifier simply has a single control to adjust the delay, then you’ll normally be able to control the following parameters:
- Time: this is the length of time it takes after the note is played, for the delay effect to kick in.
- Level: this refers to the volume of the delay effect.
- Feedback: this refers to the amount of repeats you’ll hear.
Phaser or Flanger
Phaser and flanger effects are pretty hard to explain. The best way to describe them, is by saying that they create a kind of whooshing sound. Phaser and flanger effects are pretty similar. That’s why most amplifiers will only have one of the two. The only real difference is that a flanger effect sounds a bit more artificial.
Chorus
This effect is pretty simple, but is really useful, especially during solos. It simply causes it to sound like multiple guitars are playing at the same time. The result, is more depth, presence and liveliness to your tone.
Octaver
This effect changes the pitch of your guitar. It can cause it to increase or decrease an octave. This is useful if you want to change the pitch without adjusting the tuning. It’s also good if you want to try and make a standard electric guitar sound more like a bass guitar.
Tremolo
Tremolo effects mimic the sound you get if you use a tremolo arm on your guitar. It’s particularly helpful if you have a fixed bridge, but still want to achieve a vibrato type effect.
Getting the Most out of your Amp
So now you know about the basic controls, effects, and channels on an amplifier, you’re probably wondering how everything comes together to give you the best sound. So here’s a step-by-step guide to getting the best clean, overdriven and distorted tones, on any amplifier.
If you want some more tips, then check out this post I’ve written that takes you through 7 tips to make your amp sound better.
How to Get the Best Clean Tone
If you’re looking to get a crystal clear clean tone on your electric guitar amplifier, then follow these steps.
- Set your amp to the clean channel if it has one.
- Turn the gain control all the way down. Some amplifiers are designed so that the volume completely disappears if you have the gain on 0, so if that’s the case, have it on 1 instead.
- Next, adjust the mids, treble, bass (or EQ/tone) to midway. If you feel like you need more depth, increase the bass. If you feel like you need more clarity and better note separation, then increase the treble. Or, if you feel like your tone is getting lost amongst other instruments, the increase the mids.
- Add some light reverb.
- Play about with any other effects like delay or chorus if you need to.
How to Get the Best Overdriven (Crunch) Tone
Overdriven crunchy tones are used by loads of bands, particularly those who play rock ‘n’ roll or blues style music. Here’s how to adjust your amplifier to get the best overdriven tone.
- Figure out what channel you need. If you have an overdriven channel, then great, use it! But if you only have a clean or distorted channel, you’ll need to make a decision. If your clean channel has little to no gain, whatsoever, then go with your distorted channel. The key is to have enough gain so that it sounds crunchy, but not heavy.
- Adjust the gain control. If you’re using a distorted channel, then you’ll probably want to start with the gain on around 3, and adjust upwards from there. If you’re using a clean channel, then you’ll usually need your gain to be on around 8, possibly even higher.
- Set your treble, mids and bass to midway. Follow the same steps as you would to get a good clean tone. Increase the treble if you need more sharpness, increase the bass if you need more of a low-end boost, and increase the mids if you need more depth.
- Add some light reverb.
How to Get the Best Distorted Tone
Now we’ll move onto how to get that thick, heavy distorted tone that’s commonly associated with metal and heavy rock music.
- Use the distorted channel on your amplifier.
- Adjust the gain control. You’ll probably need it on around 6 or higher, but be careful not to go too high. You need to get the balance between being able to hear notes changing, and having that high level of gain.
- Now, you can adjust your treble, bass and mids. If you’re struggling to get enough note separation and clarity, but can’t turn the gain down, or you’ll lose all the sustain, then increase the treble. You’ll want the mids to be set so your tone doesn’t sound “scooped” and can be heard amongst other instruments. The bass can be increased to give you a “boomy” quality.
- Add in any effects you need like reverb, delay, chorus etc.
Check out my full guide to distorted amp settings here.
Amp Setting Examples
Okay, so I know that a lot of guitarists simply want to jump online and find the perfect amp settings for rock, blues, metal, country etc. However, unfortunately it’s not that simple.
There really isn’t a one size fits all for amplifier settings because there are so many variables involved. What sounds perfect on one amplifier, can sound completely wrong on another.
With that said, I understand that for a complete beginner, it can be really hard to know where to start, even with the information I’ve given you already. So in the next part of this post, I’m going to go through some suggested amp settings for different styles of music. However, these are only supposed to be used as a starting point.
Start with these amp settings if you’re really unsure where to begin, and then have another read of what the different controls mean, and adjust from there. It’s a lot of trial and error, so be patient, it gets easier the more you do it. Remember to only adjust one control at a time, and then listen carefully to the impact it makes on your tone.
I’ve also made an article with example amp settings for over 40 popular guitar songs here to help you sound more like your favourite players.
Amp Settings for Rock
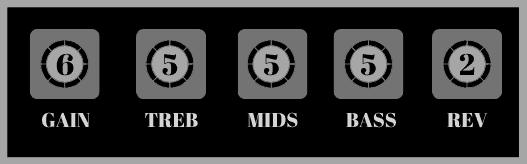
It’s hard to pick some general settings for rock music, because it varies so much and there are so many different types of rock. But generally, you want the gain on around 6 to give you enough distortion and crunch, but without affecting the clarity. The treble, mids and bass are all usually quite balanced. You’ll also usually benefit from a bit of low level reverb to give your tone some more presence.
Check out this post on the best amplifier settings for rock music to learn more.
Amp Settings for Metal
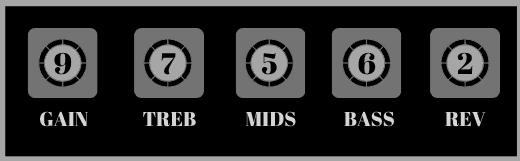
Of course, with heavy metal, you’ll want the gain cranked up pretty high. In order to compensate for so much distortion, you’ll want the treble moderately high in order to give you that boost of clarity to overcome the muddiness of the distortion. The mids and bass will usually be fairly balanced and a bit of reverb will give your tone so more character.
Amp Settings for Blues
You don’t want the gain to be very high for blues, as you’re looking for a more saturated and crunchy tone, rather than a distorted one. The treble and mids are fairly moderate to give a balanced sound. The bass shouldn’t be that high because you don’t want your tone to have a particularly “boomy” quality. You’ll usually benefit from some reverb to make the single notes stand out a bit more.

Amp Settings for Country
You’ll usually want a clean tone for country music, so have the gain as low as you can without losing all the volume. To give you that twangy country tone, have the treble moderately high. The sound is usually more scooped with country music than other styles, so have the mids moderately low, and the bass turned down a bit more.
I have loads more amp settings guides for different styles of music and even for different bands. Check out more amp settings guides.
So there you go! That’s the ultimate guide to guitar amp settings and controls! I hope you’ve found this article helpful, thanks for reading. Here are some other posts you might find useful:
Thanks Heather!
I can’t begin to tell you how much you’ve helped me. I’ve been fiddling with guitars for over 30 years, trying to figure out and understand what the settings on the amp or type of guitar did. Chasing a sound blindly, hopelessly. Frustrating to say the least attempting to accidentally stumble on SRV, Willy G or Angus. Hopeless and disappointing not to mention expensive!
Thanks to you and this site I finally have a clue on what the knobs do on my amp, guitar, pedal I just wanted to say thanks, I really appreciate the detailed explanations.
Thanks very much for taking the time to leave a comment. I’m very glad you’ve found the website helpful!