Achieving a distorted tone using your guitar’s amplifier can be a difficult challenge. However in this article, I’ll be going exactly how to dial that distortion, some common problems you might face, and also some pre-sets you can try.
The Quick Answer
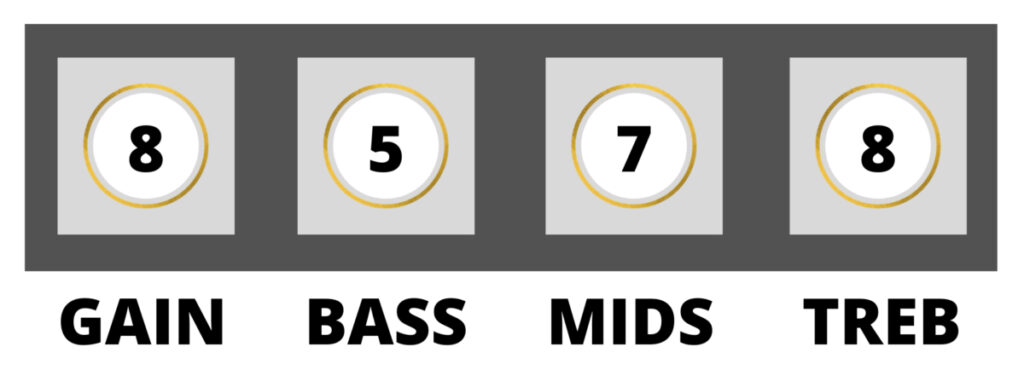
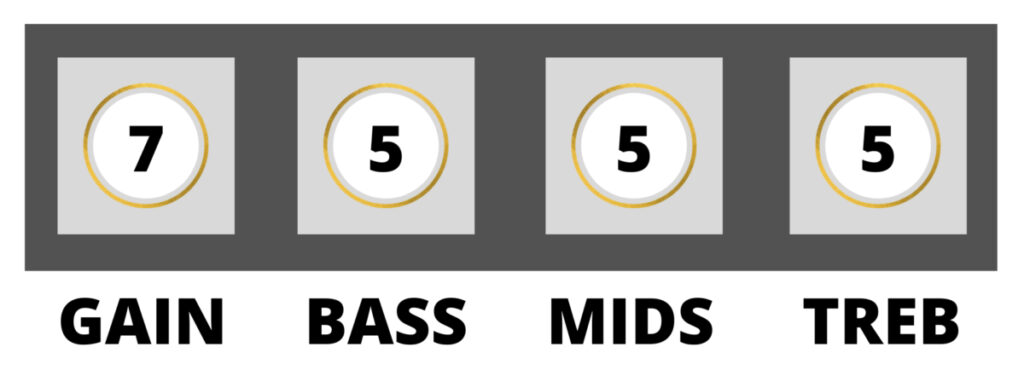
For a distorted tone, set your amplifier settings to 7-9 for gain, 4-5 for bass, 5-7 for mids and 5-7 for treble. For metal, consider decreasing the mids and increasing the treble and bass. For heavy rock distortion, lower the gain slightly, and increase the mids.
Keep in mind, that this is just a starting point. The exact settings you use will depend on your guitar, amp and the style of distortion you are trying to achieve.
In order to help you achieve the best distortion tone possible using your amp, I’ve split this article into the following sections;
- Basic controls commonly found on amplifiers and how to adjust them for distortion
- Step-by-step guide to achieving a distorted tone from scratch
- Examples of amp settings for distortion
- Common problem and how to fix them
The Basics
Now we’ve been through the brief answer, let’s take a look at the common controls you will find on your amp, and how your settings will differ, depending on the type of amp you have.
If you’re just looking for some example settings (presets) skip ahead to the second part of the article.
Tube (Valve) vs Solid State Amplifiers
When trying to achieve any type of tone on your amp, it’s important to know if you have a solid-state, or a tube (valve) amplifier.
- Solid-state: this is the most common amp type for beginners and will have a dedicated gain/ overdrive or distortion channel or control on the amp.
- Tube (valve): To achieve a distorted tone, you will need to turn the volume up until the sound begins to break up. These will have master volume and “preamp” controls.
It is much easier to achieve a distorted tone on a solid state amplifier, because you will not need to turn up the volume.
Achieving a distorted tone on a tube/ valve amp can be more difficult, especially if it has a lot of headroom (this means you can turn the volume up high before the tone begins to distort). In this case, it is often best to purchase a distortion pedal, and use this to achieve the tone instead.
However, you can increase the master volume to full on your tube amp and then use the “preamp” control to adjust the volume, which allows you to increase distortion at lower levels.
Amp Channels
Most solid-state amplifiers will have at least two “channels”. One is likely to be called the “clean” channel, and the other will commonly be called either distortion, overdrive (OD) or gain, no matter the name though, they’ll have the same effect.
Set your amp to the distortion/ gain/ overdrive channel, unless you are using a distortion pedal as well. If you are using a pedal, instead use the clean channel. This will allow you to achieve the highest quality distorted tone.
Gain Controls
Here are the common gain settings you will come across on your amplifier:
- Solid-state amps: this control will often be called gain/ distortion or drive. Increasing this will cause the tone to be more distorted.
- Tube (valve) amps: it will often have a master volume control, and a preamp/ gain control. To achieve a distorted tone at low volumes, increase the master volume to maximum, and decrease the preamp control to adjust the volume.
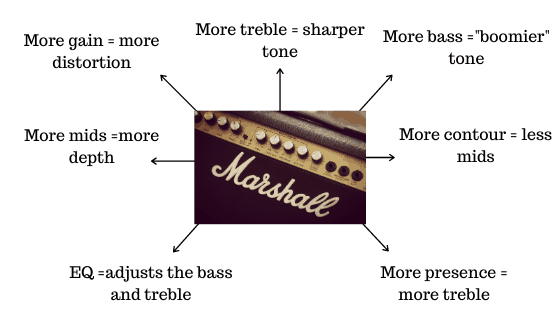
Bass, Mids and Treble (EQ) Controls
No matter if you have a solid-state or tube amp, it will likely have some controls which allow it to shape the tone, either by making it sound brighter, or more mellow. Some amps have different controls though, so here are the common ones and their function.
- Bass: this determines the low-frequency sounds. High bass settings will sound fuller and more “boomy”.
- Mids: this refers to the mid-frequency sounds. High mids settings will cause the tone to have more depth.
- Treble: this refers to the high-frequency sounds. High treble causes the tone to be crisper and sharper.
- EQ or Tone: this combines the bass, mids and treble controls. Turning the control down will play emphasis on the bass, and turning it up will play emphasis on the treble.
- Contour: this works in opposite to the mids setting. Turning it up will cause the mids to be lowered, making the tone sound thinner. Turning contour down will increase the mids, making the tone sound fuller.
- Presence: this works similarly to treble. Increasing the presence control will make the tone sound sharper and brighter.
Check out these guides to get the best from these controls:
Presence Control Explained
Contour Control Explained
Different brands also have different controls which need to be addressed. Make sure you check out the brand-specific amp controls guide which is relevant to you, to get the most from your rig:
- Fender Amp Settings
- Marshall Amp Settings
- Boss Amp Settings
- Orange Amp Settings
- Line 6 Amp Settings
- Vox Amp Settings
Other Effects
Your amp may also have some more effects built-in. Here are some common ones:
- Reverb: this will give the tone an almost echoing-quality. It will give it more presence and depth. Adding some reverb to your distorted tone will make it sound more lively.
- Delay: this causes a note to be repeated back. Be careful when using delay and distortion together as it can sometimes sound a bit messy.
- Phaser or flanger: these add a “whooshing” sound, which can work well for distorted solos.
- Chorus: this makes it sound like more than one guitar is being played. It can also be useful for distorted solos and riffs.
Step-By-Step Instructions
To achieve a good distorted tone from scratch, follow these steps:
- Select the neck pickup on your guitar and turn the guitar’s volume and tone controls up to maximum.
- Start with a comfortable volume on your amp.
- Set all the other controls to midway.
- Increase the gain control gradually and listen out for changes. Turn it up until you achieve a good level of distortion, but stop before it sounds too muddy.
- Adjust the mids control if necessary. If the tone sounds too thin, increase the mids.
- Tweak your tone/ EQ (bass and treble etc.) controls to make the tone sound either brighter or warmer. Increasing bass and decreasing treble will add warmth. Decreasing bass and increasing treble will add brightness.
- Add any extra effects in e.g. reverb.
I find that this method works universally on the amplifiers I have tried. It allows you to really understand what each control is doing, so you are able to tweak it and make minor adjustments until it sounds just right.
Remember to only make one adjustment at a time and listen for the differences. This may take a while in the beginning, but once you get an ear for the changes, the process will become much more efficient.
If you really want to improve your guitar playing then I recommend checking out Guitareo. You can sign up for a free 30-day trial here to get access to all the online lessons and start making real progress today
Examples (Presets)
Whilst I think that you are best off following the steps above to achieve the best distorted tone possible, I understand that presets can be really useful, especially for newer guitarists. Here are some distortion preset amp settings that you can try. If they don’t sound quite right, try following the steps above, or skip ahead to the “common problems” section to identify the issues.
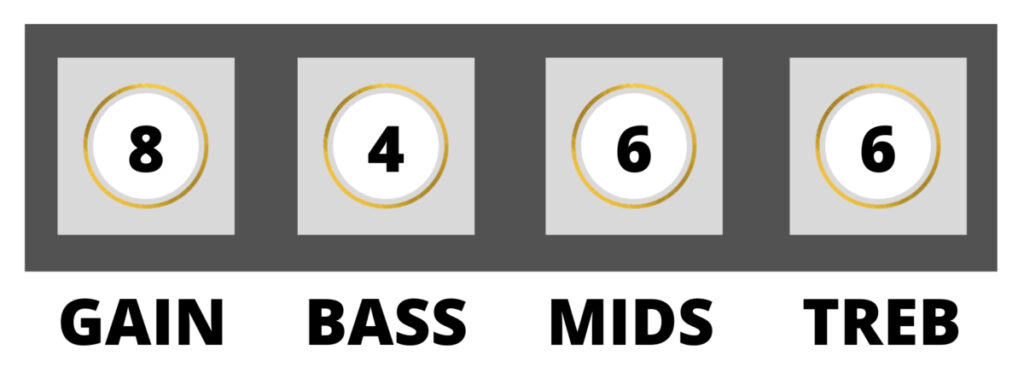
Distorted Heavy Metal Settings
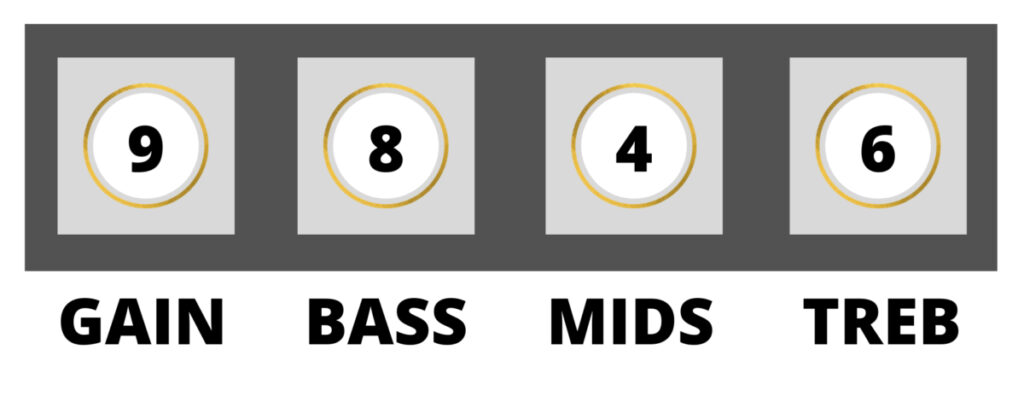
Distorted Hard Rock Settings
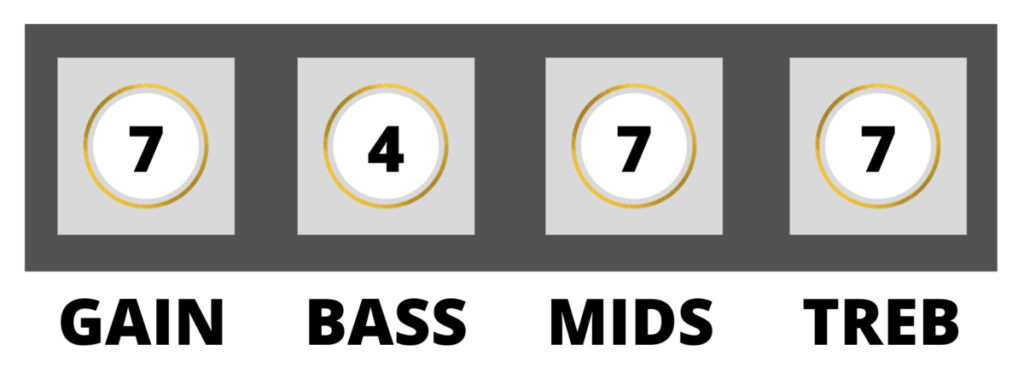
Distorted Lead Guitar Settings
Distorted Rhythm Guitar
Common Problems (and How to Fix Them)
If you’ve been through the steps above and the tone doesn’t sound quite right, then take a look at these common issues and how to fix them.
Remember to make these adjustments one at a time and listen for the changes. Also, if your amp settings are not called gain, bass and mids, then skip back up to “the basics” section to see the alternative names your amp might be using.
Muddy or Muffled Tone
This is common when you are trying to achieve a heavy distorted tone, especially if your guitar has humbucker pickups. Try these adjustments:
- Decrease the gain
- Decrease the bass
- Increase the treble
- Use the neck pickup on your guitar and ensure that it’s tone and volume controls are set to maximum
Check out my guide on how to fix a muddy amp for more causes and fixes.
Thin and Weak Tone
This is common with single-coil pickups and can be particularly evident when trying to achieve a “metal tone” or when palm-muting. Here’s what to adjust:
- Increase the bass
- Increase the mids
- Increase the gain
- Switch to the middle or neck pickup on your guitar (then increase the treble if needed)
Feedback Issues
This is a common problem when using high gain, particularly if the guitar has single-coil pickups. Here’s what to try:
- Decrease the gain
- Decrease the volume
- Position the amp in front of the guitar, rather than behind it
- Position the amp and guitar as far away from each other as possible
- Try using a noise-gate pedal to reduce feedback
More Quick Tips
Before you go, here are my quick tips to achieving a great distorted tone:
- Utilise your pickup selector when switching between lead and rhythm sections. The neck pickup will best suit lead sections, whilst the bridge pickup may be required for a more mellow rhythm tone.
- Consider purchasing a compression pedal to achieve an overall more professional sounding distorted tone. Take a look at my guide to compression pedals to learn more.
- Choose heavier gauge (thicker) strings if you can. These often produce a fuller sound which is perfect for distortion.
- Lower your pickups if your guitar doesn’t have very good sustain.
- Keep the action of your guitar low to make riffs easier to play.
Here are some more articles you might find helpful: